各平台安装yarn
Mac基于brew安装yarn
brew install yarn

yarn -vWindows系统使用yarn
说明
从nodejs的16.10版本开始,nodejs安装包就附带了yarn。所以只要你的nodejs版本大于等于16.10,只需要一个命令就可以使用了,非常方便。
启用yarn
注意,必须是管理员权限打开的终端执行下面的命令
# 执行下面的命令启用yarn
corepack enable


C:\Windows\system32>corepack enable

C:\Windows\system32>yarn -v
1.22.15

C:\Windows\system32>如果你的nodejs版本小于16.10,那么你必须先执行安装corepack后再启用yarn。
npm i -g corepack
corepack enable更详细的参考:https://yarnpkg.com/getting-started/install
基于yarn+vite创建vue项目
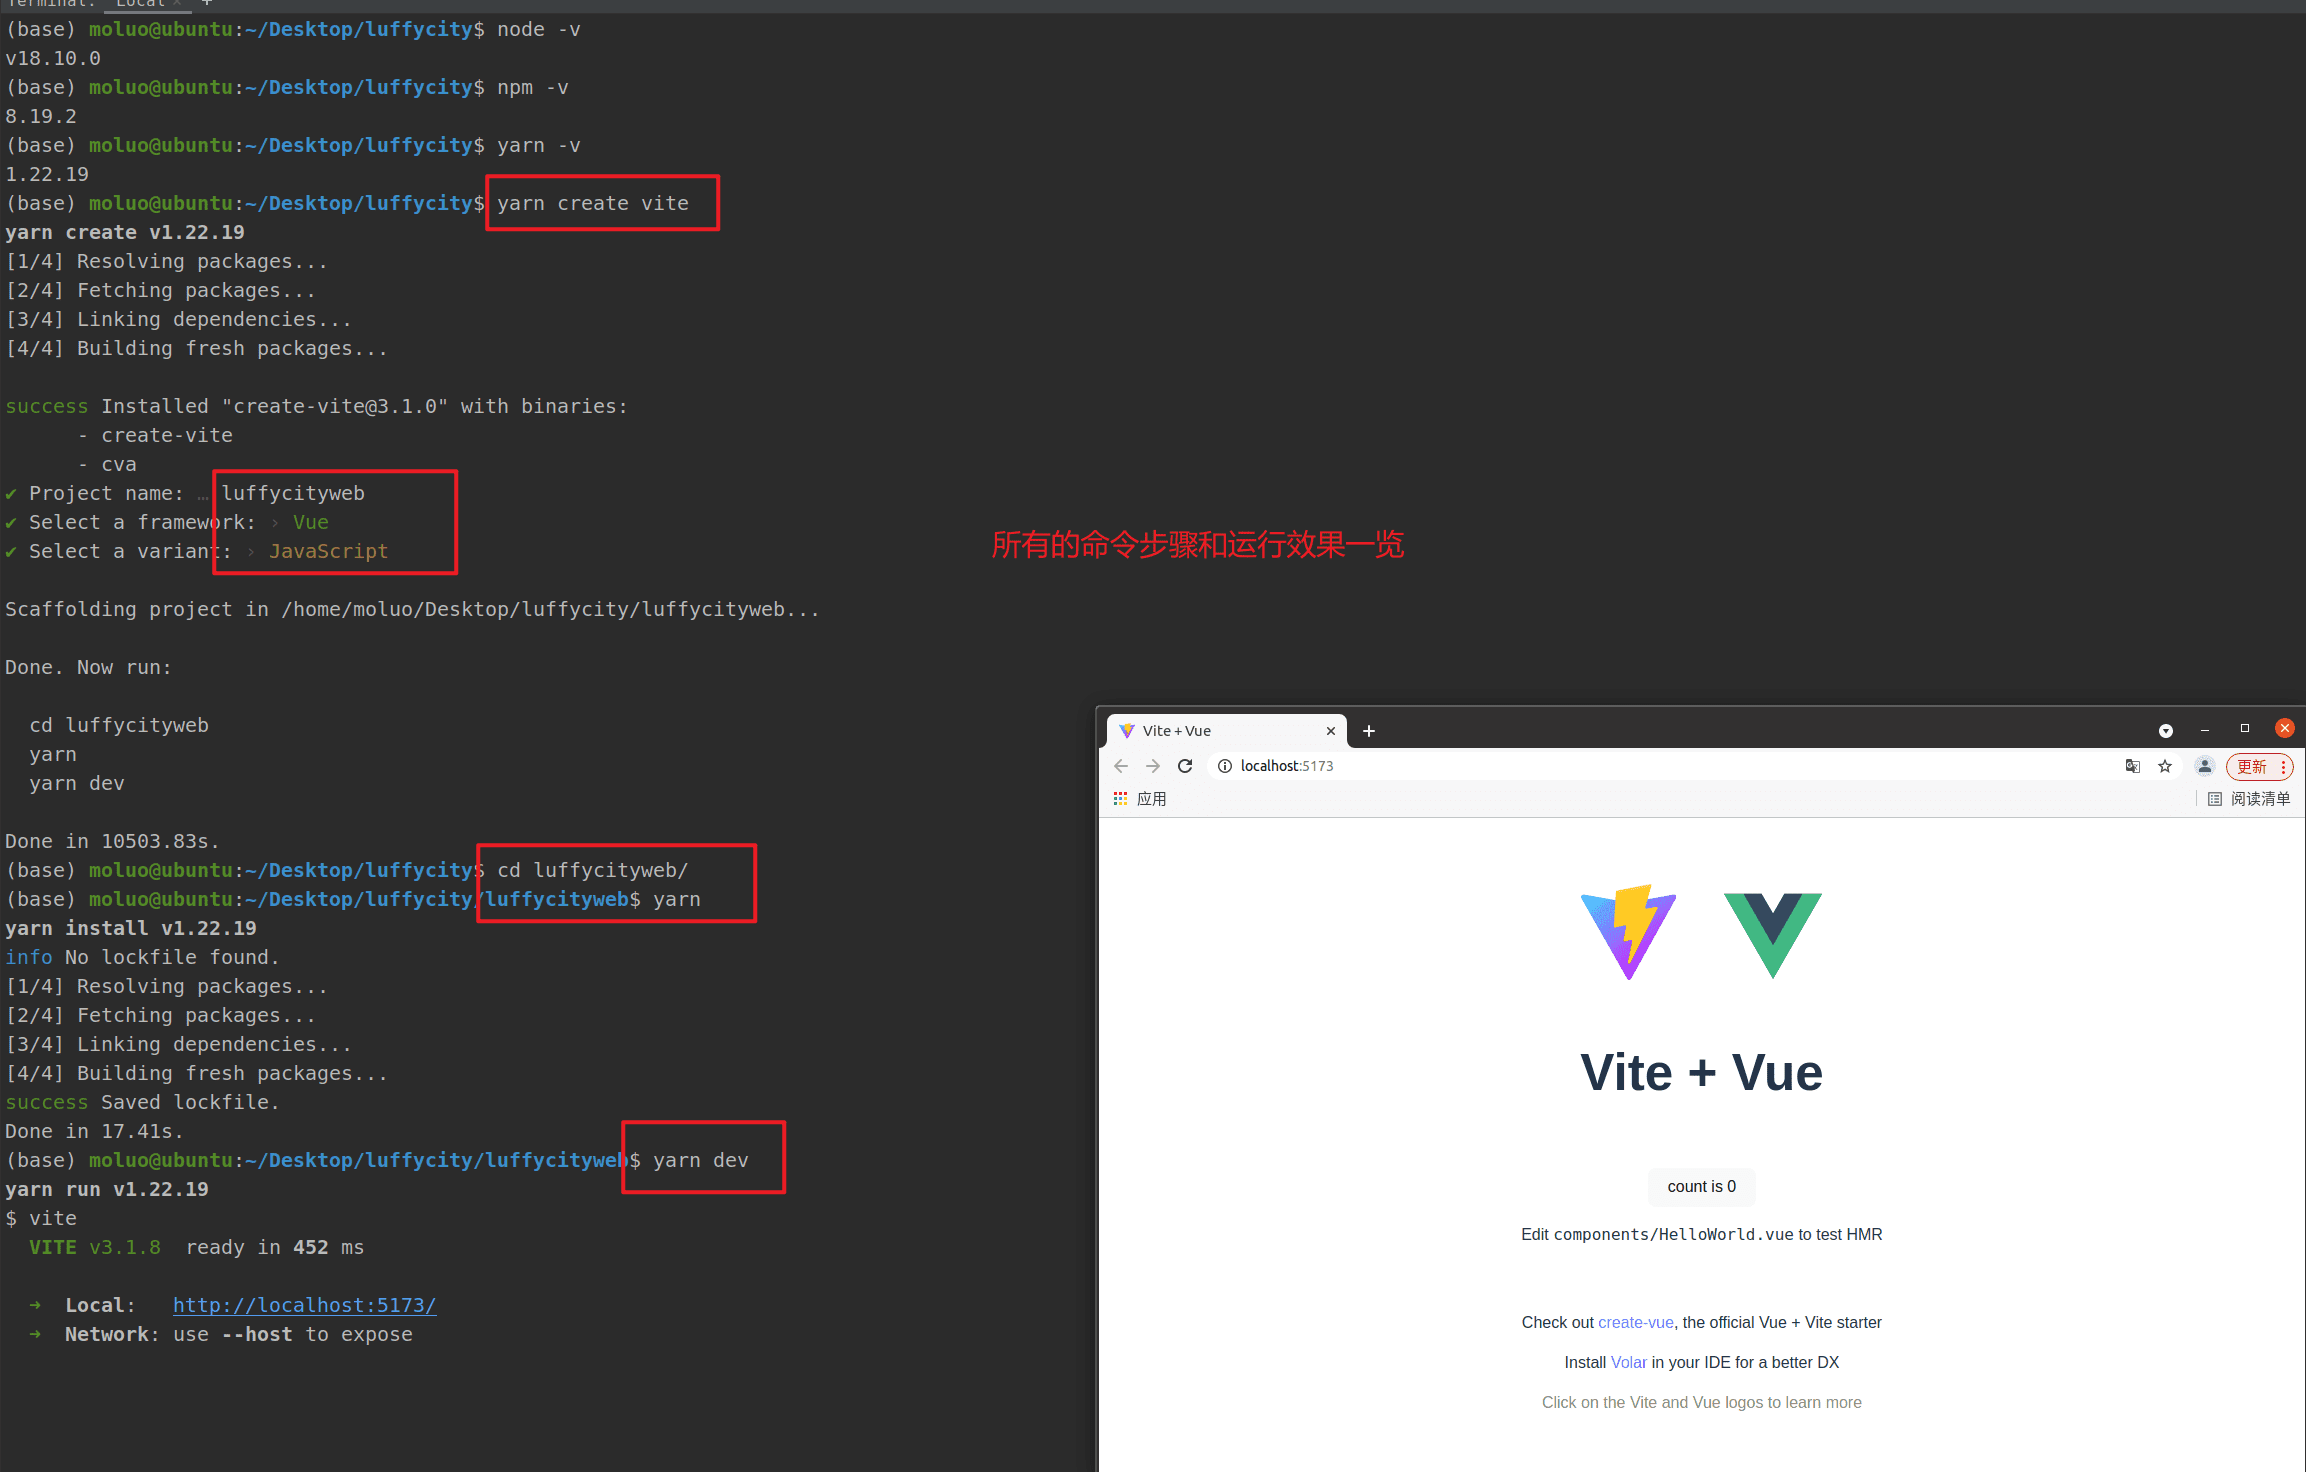
**1. 通过yarn create命令创建一个基于vite+vue3的项目 **
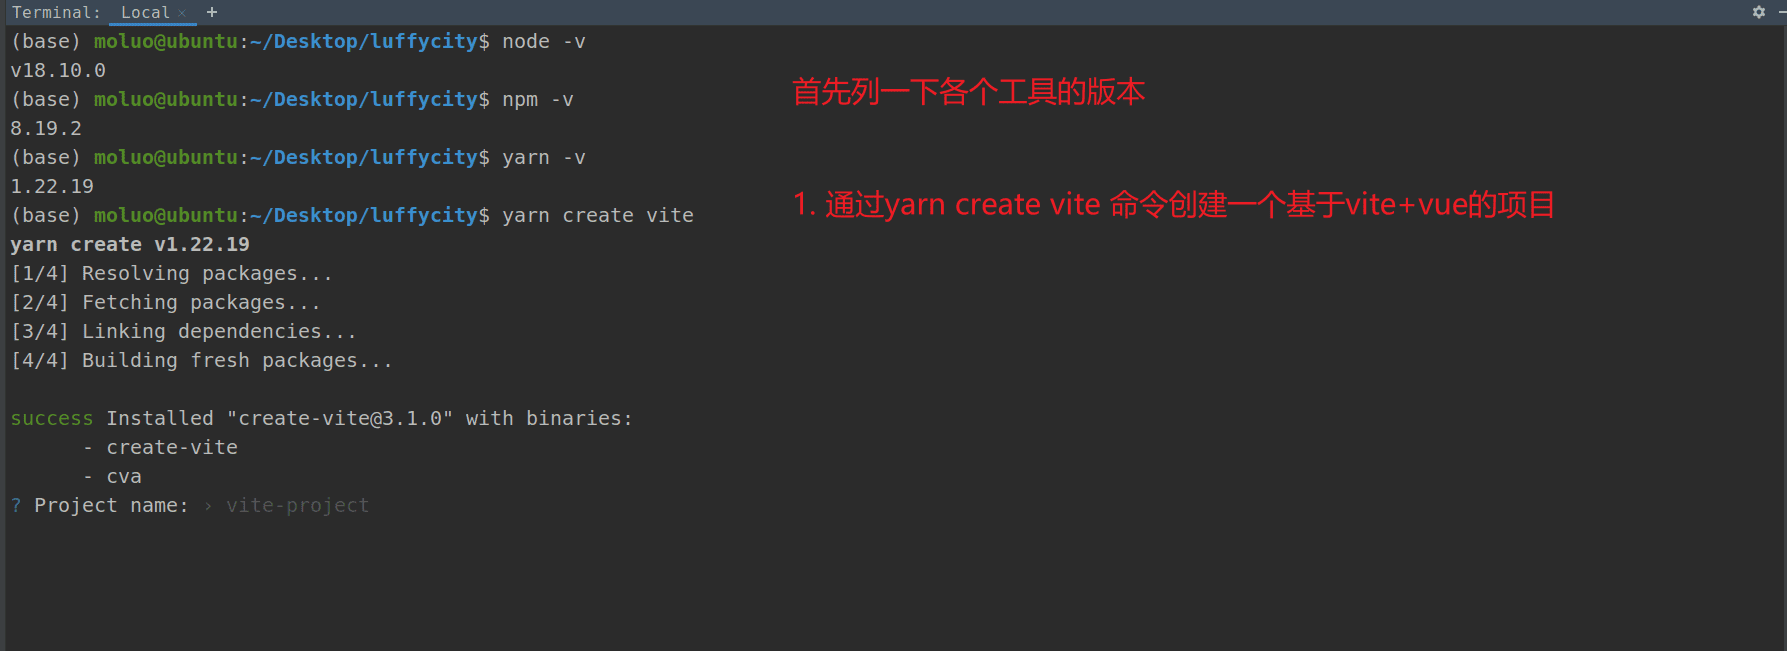
**2/3. 输入项目名和选择vue **
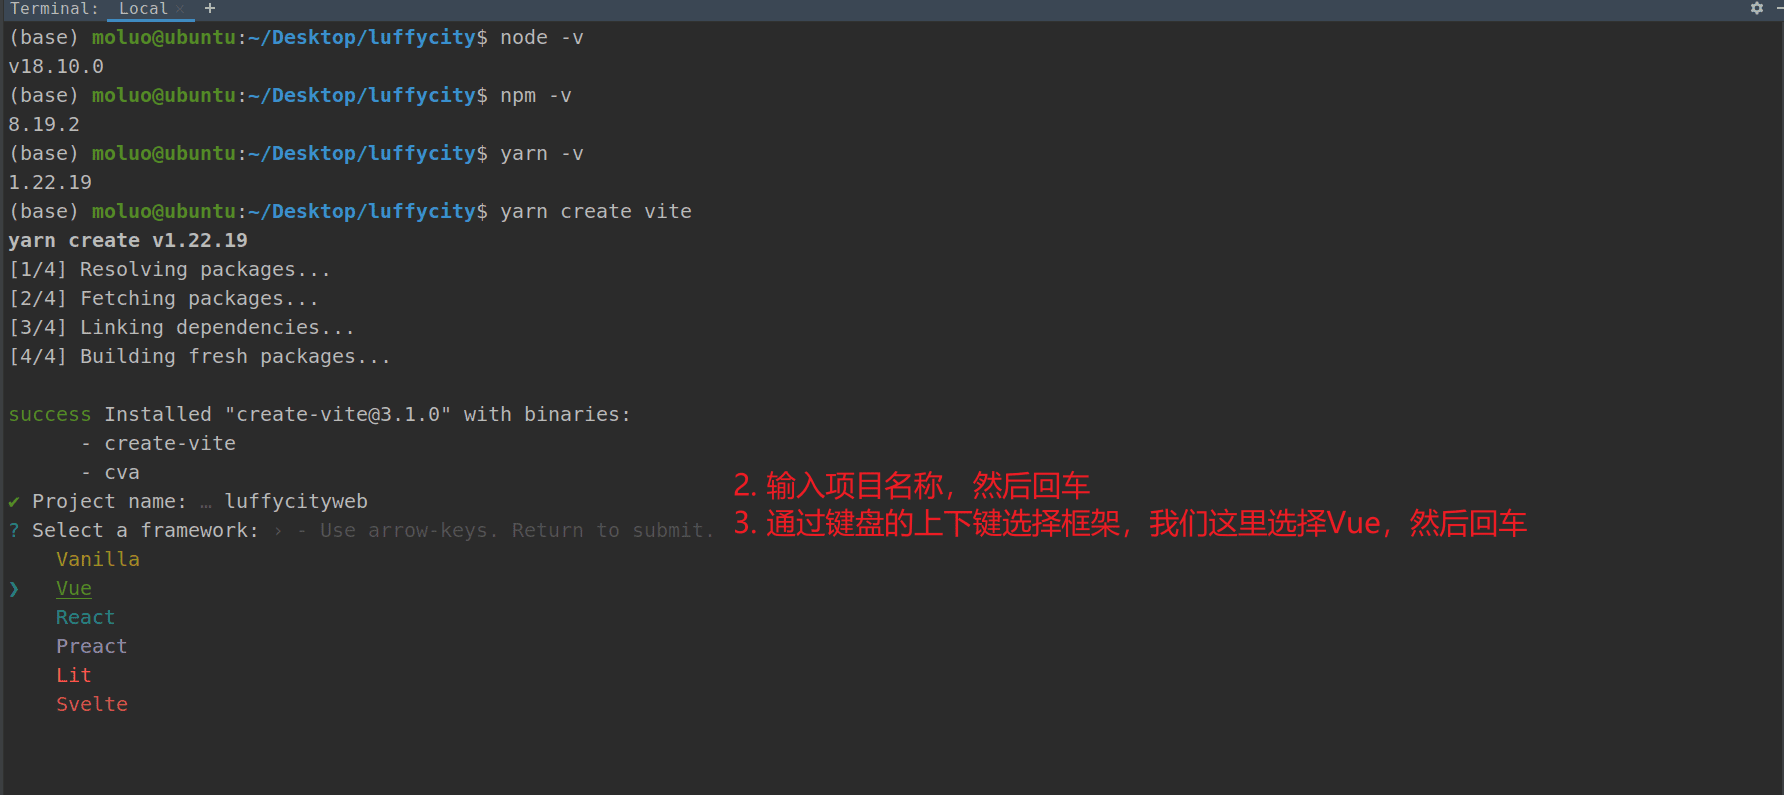
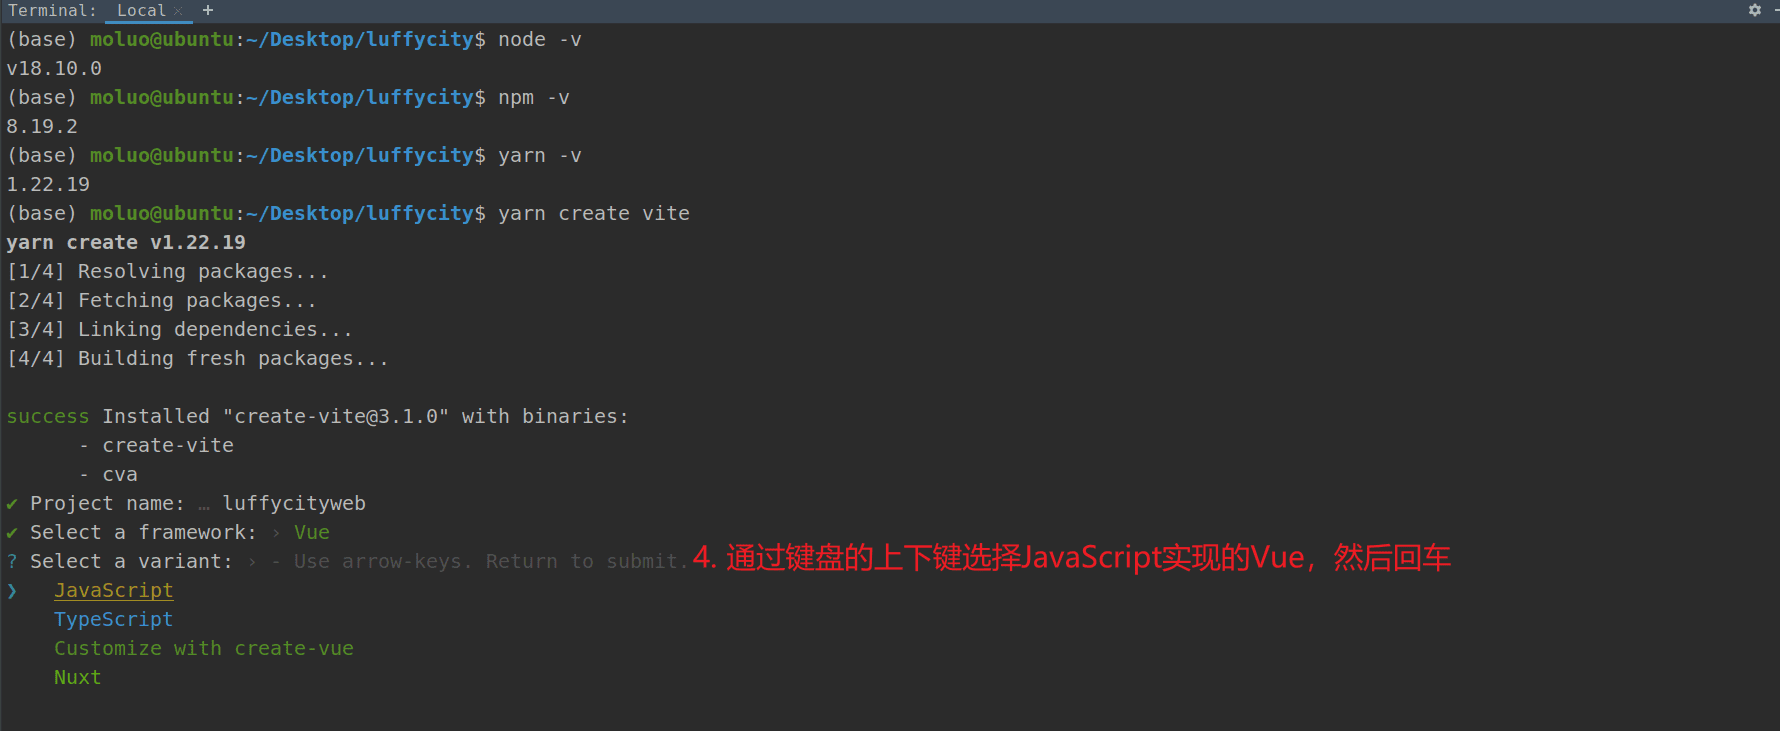
4. 选择JavaScript语言实现的vue
而typescript是微软搞的一个相当于是JavaScript的超集的一个语言,对它没了解的,我们还是踏实的选择JavaScript语言实现的vue吧。
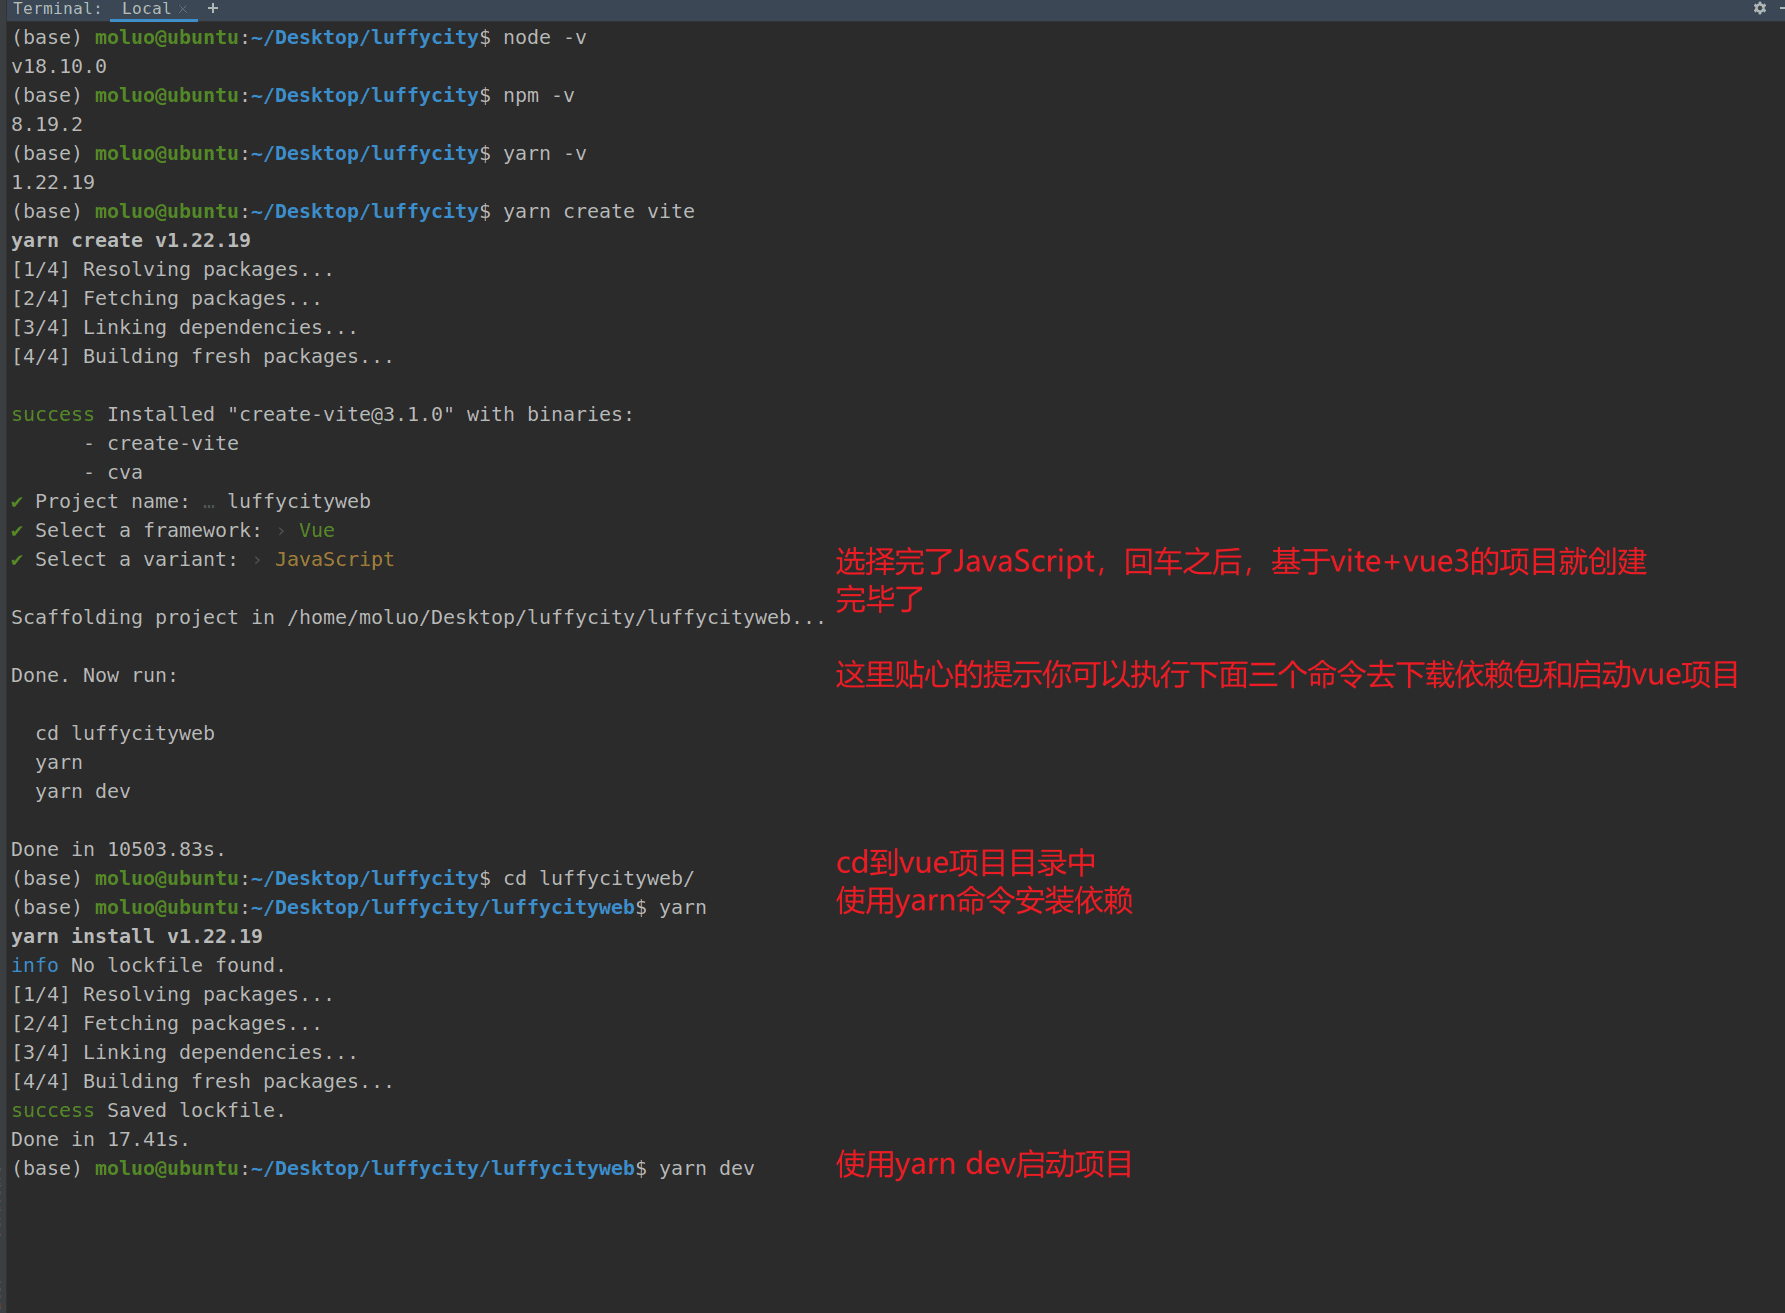
完事项目就创建好了,接下来我们只需要下载依赖后,就可以启动项目了:
前端访问效果:
常见报错
Internal Error: EPERM: operation not permitted, open 'C:\software\nodejs\pnpm'
windows11 + node-v18.15.0
Windows终端开启yarn时,报错:
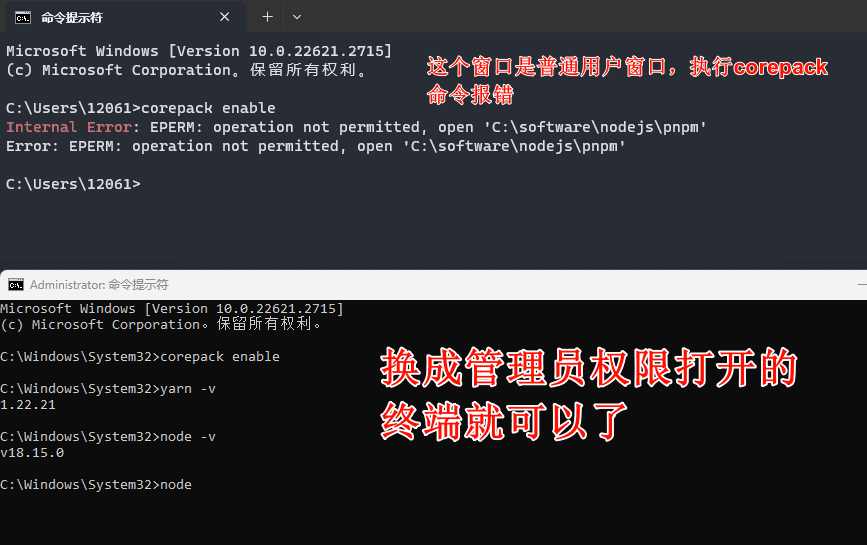
解决办法也在上图中。
Command 'yarn' not found, but can be installed with:
ubuntu2004 + npm8.19.2
使用yarn创建vite报错:
(base) moluo@ubuntu:~/Desktop/luffycity$ yarn create vite

Command 'yarn' not found, but can be installed with:

sudo apt install cmdtest这是因为没有下载yarn或者下载的有问题导致的。
我们可以:
# 卸载掉原来的yarn
(base) moluo@ubuntu:~/Desktop/luffycity$ sudo apt remove cmdtest yarn -y

# 重新安装
(base) moluo@ubuntu:~/Desktop/luffycity$ npm install -g yarn

# 完事之后,记得重新打开一个新的终端,测试是否安装成功
(base) moluo@ubuntu:~/Desktop/luffycity$ yarn --version
1.22.19error create-vite@3.1.0: The engine "node" is incompatible with this module. Expected version "^14.18.0 || >=16.0.0". Got "14.16.0"
ubuntu2004 + npm8.19.2
使用yarn create vite时报错:
(base) moluo@ubuntu:~/Desktop/luffycity$ yarn create vite
yarn create v1.22.19
[1/4] Resolving packages...
[2/4] Fetching packages...
error create-vite@3.1.0: The engine "node" is incompatible with this module. Expected version "^14.18.0 || >=16.0.0". Got "14.16.0"
error Found incompatible module.
info Visit https://yarnpkg.com/en/docs/cli/create for documentation about this command.根据报错内容,我们发现是node版本比较低,必须大于14.18.0,而我们此时的node版本是14.16.0,来测试下:
(base) moluo@ubuntu:~/Desktop/luffycity$ node -v
v14.16.0所以,我们可以通过nvm来搞个最新的node版本,并且切换过去,就行了。
# 查看所有的node版本
nvm ls-remote

# 然后下载一个新的node版本,我这里以18.10.0为例
nvm install 18.10.0

# 下载完,要use使用这个版本
nvm use 18.10.0

# 然后node -v确认下
(base) moluo@ubuntu:~/Desktop/luffycity$ node -v
v18.10.0

# npm也没问题
(base) moluo@ubuntu:~/Desktop/luffycity$ npm -v
8.19.2

# 由于当前使用这个18.10.0版本的node是新的,啥都需要手动从新配置,所以yarn还需要我们手动再配置一下,如果你习惯使用cnpm的话,也需要你手动配置
(base) moluo@ubuntu:~/Desktop/luffycity$ npm install -g yarn

added 1 package in 2s

# 测一下,看看有没有问题
(base) moluo@ubuntu:~/Desktop/luffycity$ yarn -v
1.22.1900h00m00s 0/0: : ERROR: [Errno 2] No such file or directory: 'create'
这个是在使用yarn create命令时报的错。

其原因就是node版本低,截图中的版本应该是node14.16.0的版本吧,忘了截图了,这个版本的node使用npm安装yarn之后,就不好使。
所以我们使用nvm来下载一个高版本的node,然后在下载yarn,再用yarn create就没啥问题了。
# 1. 使用nvm安装node18.10.0
nvm install 18.10.0

# 2. 使用nvm切换当前node版本为18.10.0
nvm use 18.10.0

# 2.1 切换之后,可以使用下面几个命令看下能否正常返回版本号
node -v
npm -v

# 3. 上面两步没问题之后,就可以通过npm命令安装yarn了
npm install yarn -g

# 3.1 成功之后,就可以通过下面命令测试
yarn -v

# 4. 上面几个步骤都没问题之后,就可以再重新尝试yarn create命令了
yarn create viteyarn create vite时,报SyntaxError:Unexdected token '.'的错误
ubuntu20.04
终端通过yarn创建vite项目时,报错:

我发现用的node是12版本,所以这个解决方式就是安装nvm,再通过nvm安装新版的node,比如18版本的,然后再重新执行yarn命令创建vite项目。
安装nvm的过程
参考nvm的github官档:https://github.com/nvm-sh/nvm,使用下面的命令安装nvm:
# 先安装 curl
sudo apt install curl

# 在按照官档建议的命令安装
(base) twq@twq-virtual-machine:~/Desktop/luffeicity$ curl -o- https://raw.githubusercontent.com/nvm-sh/nvm/v0.37.0/install.sh | bash
  % Total    % Received % Xferd  Average Speed   Time    Time     Time  Current
                                 Dload  Upload   Total   Spent    Left  Speed
  0     0    0     0    0     0      0      0 --:--:-- --:--:-- --:--:--     0
curl: (7) Failed to connect to raw.githubusercontent.com port 443 after 15 ms: Couldn't connect to server结果报错了...........
解决方式,就是按照官档采用git安装,注意,官档建议git版本必须大于 v1.7.10+,我这里符合条件,所以,执行下面的安装命令:
(base) twq@twq-virtual-machine:~/Desktop/luffeicity$ git --version
git version 2.34.1

# 然后执行下面的命令
cd ~/
git clone https://github.com/nvm-sh/nvm.git .nvm
git checkout v0.39.5
. ./nvm.sh

# 添加环境变量
sudo vim ~/.bashrc

# 打开的文件中,在最后,追加这些内容
export NVM_DIR="$HOME/.nvm"
[ -s "$NVM_DIR/nvm.sh" ] && \. "$NVM_DIR/nvm.sh"  # This loads nvm
[ -s "$NVM_DIR/bash_completion" ] && \. "$NVM_DIR/bash_completion"

# source一下,使其生效
source ~/.bashrc
# 接下来就可以测试了
(base) twq@twq-virtual-machine:~/.nvm$ nvm -v
0.39.5安装成功。
附赠的命令,安装node18版本的,我写这个博客时,node最新的lts版本是18.17.1,所以,我这么做:
nvm install 18.17.1
nvm ls
nvm use 18.17.1

(base) twq@twq-virtual-machine:~/.nvm$ node -v
v18.17.1
(base) twq@twq-virtual-machine:~/.nvm$ npm -v
9.6.7
(base) twq@twq-virtual-machine:~/.nvm$ yarn -v
1.22.19完事之后,再用yarn命令从新create就好了。
warning package-lock.json found. Your project contains lock files generated by tools other than Yarn. It is error Error: certificate has expired
win11 yarn1.22.21 node18.15.0
使用yarn add三方包时报错:
(base) D:\BaiduSyncdisk\wangzhangkai>yarn add vitepress
yarn add v1.22.21
warning package-lock.json found. Your project contains lock files generated by tools other than Yarn. It is error Error: certificate has expired
    at TLSSocket.onConnectSecure (node:_tls_wrap:1540:34)
    at TLSSocket.emit (node:events:513:28)
    at TLSSocket._finishInit (node:_tls_wrap:959:8)
    at ssl.onhandshakedone (node:_tls_wrap:743:12)
info Visit https://yarnpkg.com/en/docs/cli/add for documentation about this command.解决办法,手动删除项目根目录下的package-lock.json文件,然后终端运行:
yarn install --ignore-engineserror Error: certificate has expired
win11 yarn1.22.21 node18.15.0
使用yarn add三方包时报错:
(base) D:\BaiduSyncdisk\wangzhangkai>yarn add vitepress
yarn add v1.22.21
[1/4] Resolving packages...
error Error: certificate has expired
    at TLSSocket.onConnectSecure (node:_tls_wrap:1540:34)
    at TLSSocket.emit (node:events:513:28)
    at TLSSocket._finishInit (node:_tls_wrap:959:8)
    at ssl.onhandshakedone (node:_tls_wrap:743:12)
info Visit https://yarnpkg.com/en/docs/cli/add for documentation about this command.解决,执行下面命令:
yarn config set "strict-ssl" false -g然后重新尝试安装模块即可。参考:https://stackoverflow.com/questions/40033794/yarn-unable-to-verify-the-first-certificate -verify-the-first-certificate>