 王张开
王张开about
在Vue快速入门篇,我们学习Vue的基本用法,但说白了,我们是将Vue当成jQuery一样使用,就是在写Vue版的JavaScript代码。
接下来,我们学习Vue的组件化开发模式,这也是开发中最常用的模式。
component
组件(Component)就像外置网卡、外置蓝牙一样,插到主机上,就能提供的相关的功能,组件可以是一段代码、一个完整功能、一个模块的封装。
组件有两个明显的特点:
- 内聚性:高内聚。
- 耦合性:低耦合。
Vue中,也推荐使用组件化开发模式,将一个完整的功能封装成组件,然后,就是哪里需要直接导入即可。
Vue的组件分为普通组件和单文件组件,二者都有各自的应用场景。
这里我们先来通过学习普通组件,而单文件组件通常结合脚手架使用,我们后面再聊。
组件快速上手
<!DOCTYPE html>
<html lang="en">
<head>
    <meta charset="UTF-8">
    <title>Title</title>
    <style>
        body {
            margin: 0;
        }

        .container {
            width: 980px;
            margin: 0 auto;
        }

        .menu {
            height: 48px;
            background-color: #499ef3;
            line-height: 48px;

        }

        .menu a {
            color: white;
            text-decoration: none;
            padding: 0 10px;
        }
    </style>
    <script src="https://cdn.jsdelivr.net/npm/vue@2/dist/vue.js"></script>
    <script src="https://unpkg.com/vue-router@3.6.5/dist/vue-router.js"></script>

</head>
<body>


<div id="app">
    <div>{{name}}</div>
    <div class="menu">
        <div class="container">
                <router-link to="/">logo</router-link>
                <router-link to="/home">首页</router-link>
                <router-link to="/course">课程</router-link>
                <router-link to="/news">资讯</router-link>
        </div>
    </div>
    <div class="container">
        {{name}}
        <router-view></router-view>
    </div>
</div>


<script>
    const Home = {template: '<div>首页内容...</div>'}
    const course = {template: '<div>课程内容...</div>'}
    const news = {template: '<div>资讯内容...</div>'}

    const router = new VueRouter({
        routes:[
            {path:"/",component:Home},
            {path:"/course",component:course},
            {path:"/news",component:news},

        ]})

    var app = new Vue({
        el: "#app",
        data: {
            name: "张开"
        },
        methods: {},
        router:router
    })

</script>
</body>
</html>普通组件
先来看一个普通组件的示例,在script标签内,通过Vue.component构建组件:
<!DOCTYPE html>
<html lang="en">
<head>
	<meta charset="UTF-8">
	<title>组件</title>
</head>
<body>
<div id="app"></div>
</body>
<script src="vue.min.js"></script>
<script>
    /* Vue.component接收两个参数:
    arg1:组件名[字符串类型],用于在页面中引用
    arg2:组件参数[字典类型],构建组件的细节,比如组件中使用的数据、监听、构建方法等
    */
    Vue.component(arg1, arg2)
	// 这里的vm对象只是负责绑定组件
    var vm = new Vue({
        el:"#app",
        data:{},
    })
</script>
</html>注意,为了避免组件和未来HTML页面元素相冲突,组件名命名:字母全小写且必须包含一个连接符,更多规范参考:
来个示例:
<!DOCTYPE html>
<html lang="en">
<head>
	<meta charset="UTF-8">
	<title>组件</title>
</head>
<body>
<div id="app">
    <h1>示例</h1>
    <div>
        <button @click="sub">-</button>
        <input type="text" v-model="num">
        <button @click="add">+</button>
    </div>
    <h1>将上面的示例构建成组件</h1>
    <h3>组件可以多次使用,且相互隔离</h3>
    <my-c-1></my-c-1>
    <my-c-1></my-c-1>
    <my-c-1></my-c-1>
</div>
</body>
<script src="vue.min.js"></script>
<script>
    // 通过Vue.component构建组件
    Vue.component("my-c-1", {
        // template:组件的模板元素
        template: `<div>
                        <button @click="sub">-</button>
                        <input type="text" v-model="num" :style="style1">
                        <button @click="add">+</button>
                    </div>`,
        data(){  // 组件中的数据,是函数形式的
            return {  // 将数据定义在return的字典中
                num:0,
                style1:{
                    width: "200px",
                    height:"20px"
                }
            }
        },
        methods: {
            sub(){
                if(this.num<=0){
                    this.num = 0;
                }else{
                    this.num--;
                }
            },
            add(){
                this.num++;
            }
        }
        // 你也可以在组件中使用监听
    })
    var vm = new Vue({
        el:"#app",
        data:{
            num: 0
        },
        methods: {
            sub(){
                if(this.num<=0){
                    this.num = 0;
                }else{
                    this.num--;
                }
            },
            add(){
                this.num++;
            }
        }
    })
</script>
</html>你也可以将上面的组件到单独封装成js文件,然后哪里需要就在哪里引入了。
my-c-1.js:
Vue.component("my-c-1", {
    // template:组件的模板元素
    template: `<div>
                    <button @click="sub">-</button>
                    <input type="text" v-model="num" :style="style1">
                    <button @click="add">+</button>
                </div>`,
    data(){  // 组件中的数据,是函数形式的
        return {  // 将数据定义在return的字典中
            num:0,
            style1:{
                width: "200px",
                height:"20px"
            }
        }
    },
    methods: {
        sub(){
            if(this.num<=0){
                this.num = 0;
            }else{
                this.num--;
            }
        },
        add(){
            this.num++;
        }
    }
    // 你也可以在组件中使用监听
})在HTML文件中引入:
<!DOCTYPE html>
<html lang="en">
<head>
	<meta charset="UTF-8">
	<title>组件</title>
</head>
<body>
<div id="app">
    <h1>示例</h1>
    <div>
        <button @click="sub">-</button>
        <input type="text" v-model="num">
        <button @click="add">+</button>
    </div>
    <h1>将上面的示例构建成组件</h1>
    <h3>组件可以多次使用,且相互隔离</h3>
    <my-c-1></my-c-1>
    <my-c-1></my-c-1>
    <my-c-1></my-c-1>
</div>
</body>
<script src="vue.min.js"></script>
<!-- 必须在vue核心文件引入之后再引入 -->
<script src="my-c-1.js"></script>
<script>
    var vm = new Vue({
        el:"#app",
        data:{
            num: 0
        },
        methods: {
            sub(){
                if(this.num<=0){
                    this.num = 0;
                }else{
                    this.num--;
                }
            },
            add(){
                this.num++;
            }
        }
    })
</script>
</html>但很明显,这种操作不太符合Vue的相关规范,对于这种使用模式,我们通常是以插件的形式引入,当然,我们后面再学习插件的相关用法。
vue-cli
更多vue-cli参见官网:https://cli.vuejs.org/zh/guide/
关于webpack参见:https://webpack.docschina.org/concepts/
想要学习单文件组件,我们还要做一些准备操作。
因为单文件组件通常运行在Vue的自动化工具vue-cli中,所以,我们需要配置相关环境。
vue-cli,通常也叫做脚手架,它可以帮助我们把单文件组件编译成普通的JavaScript代码。
而vue-cli通常是运行在node.js环境中,所以,我们需要:
配置node.js,vue-cli需要 Node.js 8.9 或更高版本 (推荐 8.11.0+),具体安装参考:各平台配置node.js环境,你也可以使用 nvm 或 nvm-windows在同一台电脑中管理多个 Node 版本。
使用node.js自带的npm包管理工具下载vue-cli
bash# 下载vue-clie,下载失败,使用cnpm,参考:https://www.cnblogs.com/Neeo/articles/11637320.html#npm%E7%9A%84%E4%BD%BF%E7%94%A8 # 安装(最新版) npm install -g vue-cli # 安装(指定版本) npm install -g @vue/cli@4.5.14 # 测试,返回版本号即安装成功 C:\Users\Anthony>vue -V 2.9.6
补充,npm的包管理命令:
npm install -g 包名              # 安装模块   -g表示全局安装,如果没有-g,则表示在当前项目安装
npm list                        # 查看当前目录下已安装的node包
npm view 包名 engines            # 查看包所依赖的Node的版本
npm outdated                    # 检查包是否已经过时,命令会列出所有已过时的包
npm update 包名                  # 更新node包
npm uninstall 包名               # 卸载node包
npm 命令 -h # 查看指定命令的帮助文档使用vue-cli构建项目
win10 + pycharm
vue-cli常用的命令:
# 生成一个基于 webpack 模板的新项目
vue init webpack 项目目录名
# 例如:
vue init webpack myproject


# 启动开发服务器 ctrl+c 停止服务
cd myproject
npm run dev # 运行这个命令就可以启动node提供的测试http服务器当你使用vue init构建项目的时候,会有如下几步提示信息:
? Project name vuedemo1,设置项目名称,这一步直接回车,使用默认即可。? Project description A Vue.js project,项目描述,我这也直接回车略过。? Author (zhangkai <xxxxx@163.com>),如果你的电脑上安装了git,这里会默认提取你的git账户名作为作者,我同样回车使用默认。构建项目的方式,通过键盘的上下键切换选项,选中后回车。
? Vue build (Use arrow keys) > Runtime + Compiler: recommended for most users Runtime-only: about 6KB lighter min+gzip, but templates (or any Vue-specific HTML) are ONLY allowed in .vue files - render functions are required elsewhere第一种:指的是运行时生成编译的文件,推荐使用这一种,所以我直接回车。
第二种,每次运行时,再进行转换。
? Install vue-router? No,是否安装vue-router,这里先选择输入no。后面学了vue-router后就可以选择yes了。? Use ESLint to lint your code? No,因为vue推荐使用es6新语法,所以这里提示受否使用ES6的语法检测,这里也先no。? Set up unit tests No,是否安装单元测试工具,选择no。? Setup e2e tests with Nightwatch? No,是否安装e2e测试工具,选择no。安装第三方模块的方式选择, 一般选择前两个,我这里选择nmp:
```
? Should we run `npm install` for you after the project has been created? (recommended) npm
Yes, use NPM
Yes, use Yarn
No, I will handle that myself
```
创建项目的细节:
D:\tmp\vuee>vue init webpack vuedemo1

? Project name vuedemo1
? Project description A Vue.js project
? Author zhangkai <tingyuweilou@163.com>
? Vue build standalone
? Install vue-router? No
? Use ESLint to lint your code? No
? Set up unit tests No
? Setup e2e tests with Nightwatch? No
? Should we run `npm install` for you after the project has been created? (recommended) npm

   vue-cli · Generated "vuedemo1".


# Installing project dependencies ...
# ========================

npm WARN deprecated extract-text-webpack-plugin@3.0.2: Deprecated. Please use https://github.com/webpack-contrib/mini-css-extract-plugin
npm WARN deprecated html-webpack-plugin@2.30.1: out of support
npm WARN deprecated uglify-es@3.3.9: support for ECMAScript is superseded by `uglify-js` as of v3.13.0
npm WARN deprecated chokidar@2.1.8: Chokidar 2 will break on node v14+. Upgrade to chokidar 3 with 15x less dependencies.
npm WARN deprecated browserslist@2.11.3: Browserslist 2 could fail on reading Browserslist >3.0 config used in other tools.
npm WARN deprecated bfj-node4@5.3.1: Switch to the `bfj` package for fixes and new features!
npm WARN deprecated core-js@2.6.12: core-js@<3 is no longer maintained and not recommended for usage due to the number of issues. Please, upgrade your dependencies to the ac
tual version of core-js@3.
npm WARN deprecated fsevents@1.2.13: fsevents 1 will break on node v14+ and could be using insecure binaries. Upgrade to fsevents 2.
npm WARN deprecated browserslist@1.7.7: Browserslist 2 could fail on reading Browserslist >3.0 config used in other tools.
npm WARN deprecated resolve-url@0.2.1: https://github.com/lydell/resolve-url#deprecated
npm WARN deprecated urix@0.1.0: Please see https://github.com/lydell/urix#deprecated

> core-js@2.6.12 postinstall D:\tmp\vuee\vuedemo1\node_modules\core-js
> node -e "try{require('./postinstall')}catch(e){}"

Thank you for using core-js ( https://github.com/zloirock/core-js ) for polyfilling JavaScript standard library!

The project needs your help! Please consider supporting of core-js on Open Collective or Patreon:
> https://opencollective.com/core-js
> https://www.patreon.com/zloirock

Also, the author of core-js ( https://github.com/zloirock ) is looking for a good job -)


> ejs@2.7.4 postinstall D:\tmp\vuee\vuedemo1\node_modules\ejs
> node ./postinstall.js

Thank you for installing EJS: built with the Jake JavaScript build tool (https://jakejs.com/)


> uglifyjs-webpack-plugin@0.4.6 postinstall D:\tmp\vuee\vuedemo1\node_modules\webpack\node_modules\uglifyjs-webpack-plugin
> node lib/post_install.js

npm notice created a lockfile as package-lock.json. You should commit this file.
npm WARN optional SKIPPING OPTIONAL DEPENDENCY: fsevents@~2.3.1 (node_modules\chokidar\node_modules\fsevents):
npm WARN notsup SKIPPING OPTIONAL DEPENDENCY: Unsupported platform for fsevents@2.3.2: wanted {"os":"darwin","arch":"any"} (current: {"os":"win32","arch":"x64"})
npm WARN optional SKIPPING OPTIONAL DEPENDENCY: fsevents@^1.2.7 (node_modules\watchpack-chokidar2\node_modules\chokidar\node_modules\fsevents):
npm WARN notsup SKIPPING OPTIONAL DEPENDENCY: Unsupported platform for fsevents@1.2.13: wanted {"os":"darwin","arch":"any"} (current: {"os":"win32","arch":"x64"})
npm WARN optional SKIPPING OPTIONAL DEPENDENCY: fsevents@^1.2.7 (node_modules\webpack-dev-server\node_modules\chokidar\node_modules\fsevents):
npm WARN notsup SKIPPING OPTIONAL DEPENDENCY: Unsupported platform for fsevents@1.2.13: wanted {"os":"darwin","arch":"any"} (current: {"os":"win32","arch":"x64"})
npm WARN ajv-keywords@3.5.2 requires a peer of ajv@^6.9.1 but none is installed. You must install peer dependencies yourself.

added 1273 packages from 675 contributors and audited 1280 packages in 186.768s

46 packages are looking for funding
  run `npm fund` for details

found 17 vulnerabilities (3 low, 8 moderate, 6 high)
  run `npm audit fix` to fix them, or `npm audit` for details

# Project initialization finished!
# ========================

To get started:

  cd vuedemo1
  npm run dev

Documentation can be found at https://vuejs-templates.github.io/webpack项目创建完成,就可以进入项目目录,使用npm run dev命令来启动测试服务器:
D:\tmp\vuee>cd vuedemo1

D:\tmp\vuee\vuedemo1>npm run dev

> vuedemo1@1.0.0 dev D:\tmp\vuee\vuedemo1
> webpack-dev-server --inline --progress --config build/webpack.dev.conf.js

 13% building modules 25/29 modules 4 active ...ex=0!D:\tmp\vuee\vuedemo1\src\App.vue{ parser: "babylon" } is deprecated; we now treat it as { parser: "babel" }.
 95% emitting

 DONE  Compiled successfully in 2130ms                                                                                                                               16:14:38

I Your application is running here: http://localhost:8080现在,浏览器就可以访问了:
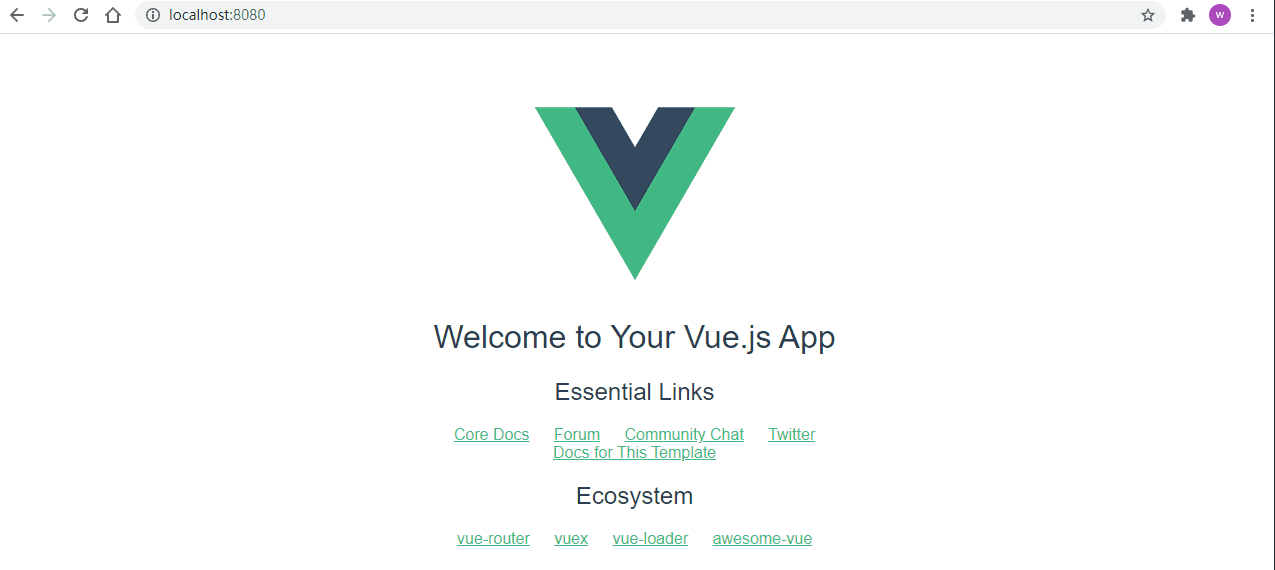
到这一步就说明,vue-cli脚手架环境配置完毕,创建项目也没问题,后续就可以愉快的进行组件化开发了。
项目目录构成
当你打开vuedemo1的项目目录,里面需要我们重点关注的目录有:
├── build/			 # 是项目打包时依赖的目录
├── config/			 # 配置目录,id和端口等等
├── dist/			 # 暂时没有这个目录,但编译后的项目就保存在这个目录内
├── index.html		 # vue项目的访问入口,非常重要的文件
├── node_modules/    # 项目运行的依赖库存储目录[非常大]
├── package.json     # 项目运行需要的依赖库记录配置
├── src/			 # 主开发目录,要开发的单文件组件全部在这个目录下的components目录下
│   ├── App.vue      # 父级组件
│   ├── router       # 后面用到了vue-router,就会有这个了,暂时没有不要紧
│   ├── assets/      # 静态资源目录,图片存放在这里
│   ├── components/  # 单文件组件保存目录,也就是所有的单文件组件都放在这个目录内
│   └── main.js		 # 项目启动文件,nmp run serve ,用户访问程序的入门
└── static/ # 静态资源目录,所有的测试时用的,但是不需要交给线上服务器的css,js等文件放在这个目录Vue项目执行流程
在刚才使用npm run dev命令启动服务并且浏览器访问得到页面,我们需要了解其执行流程。
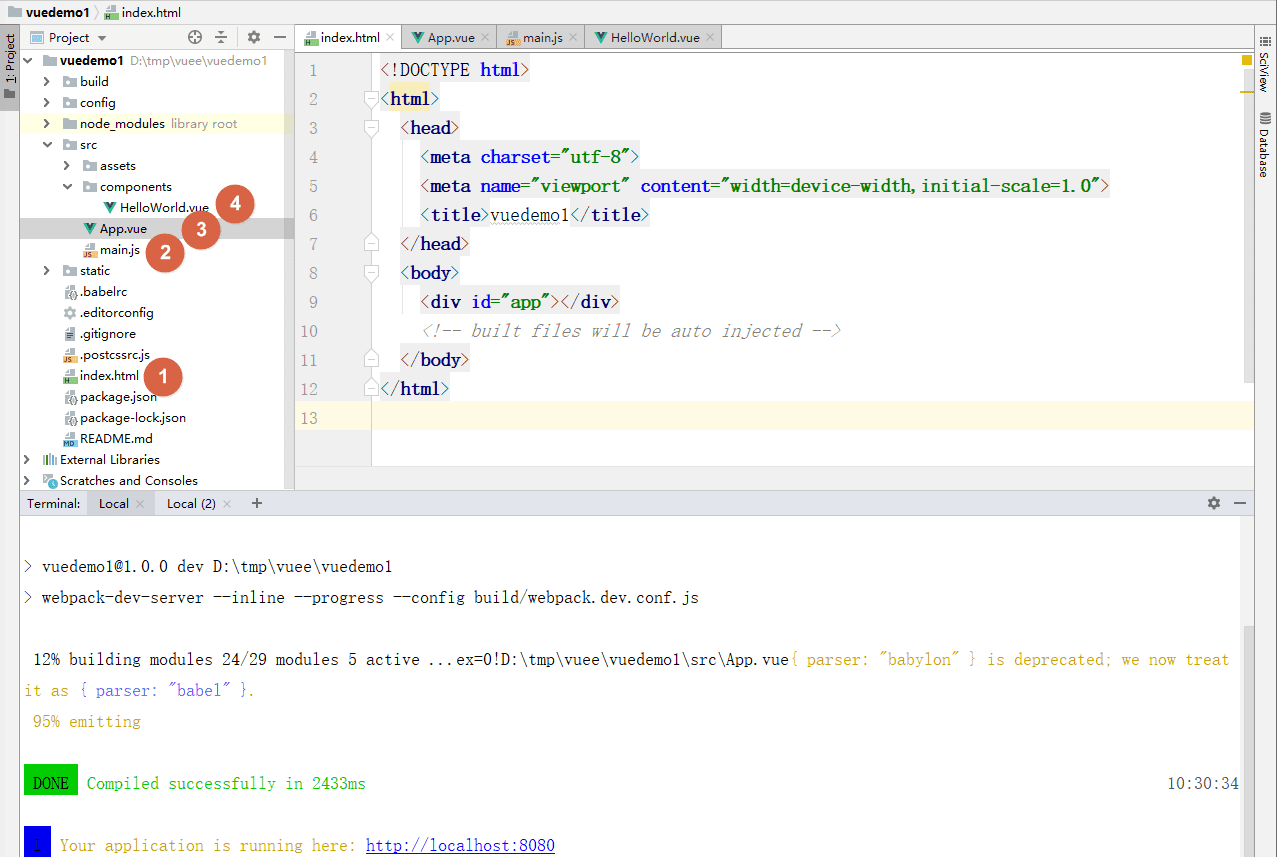
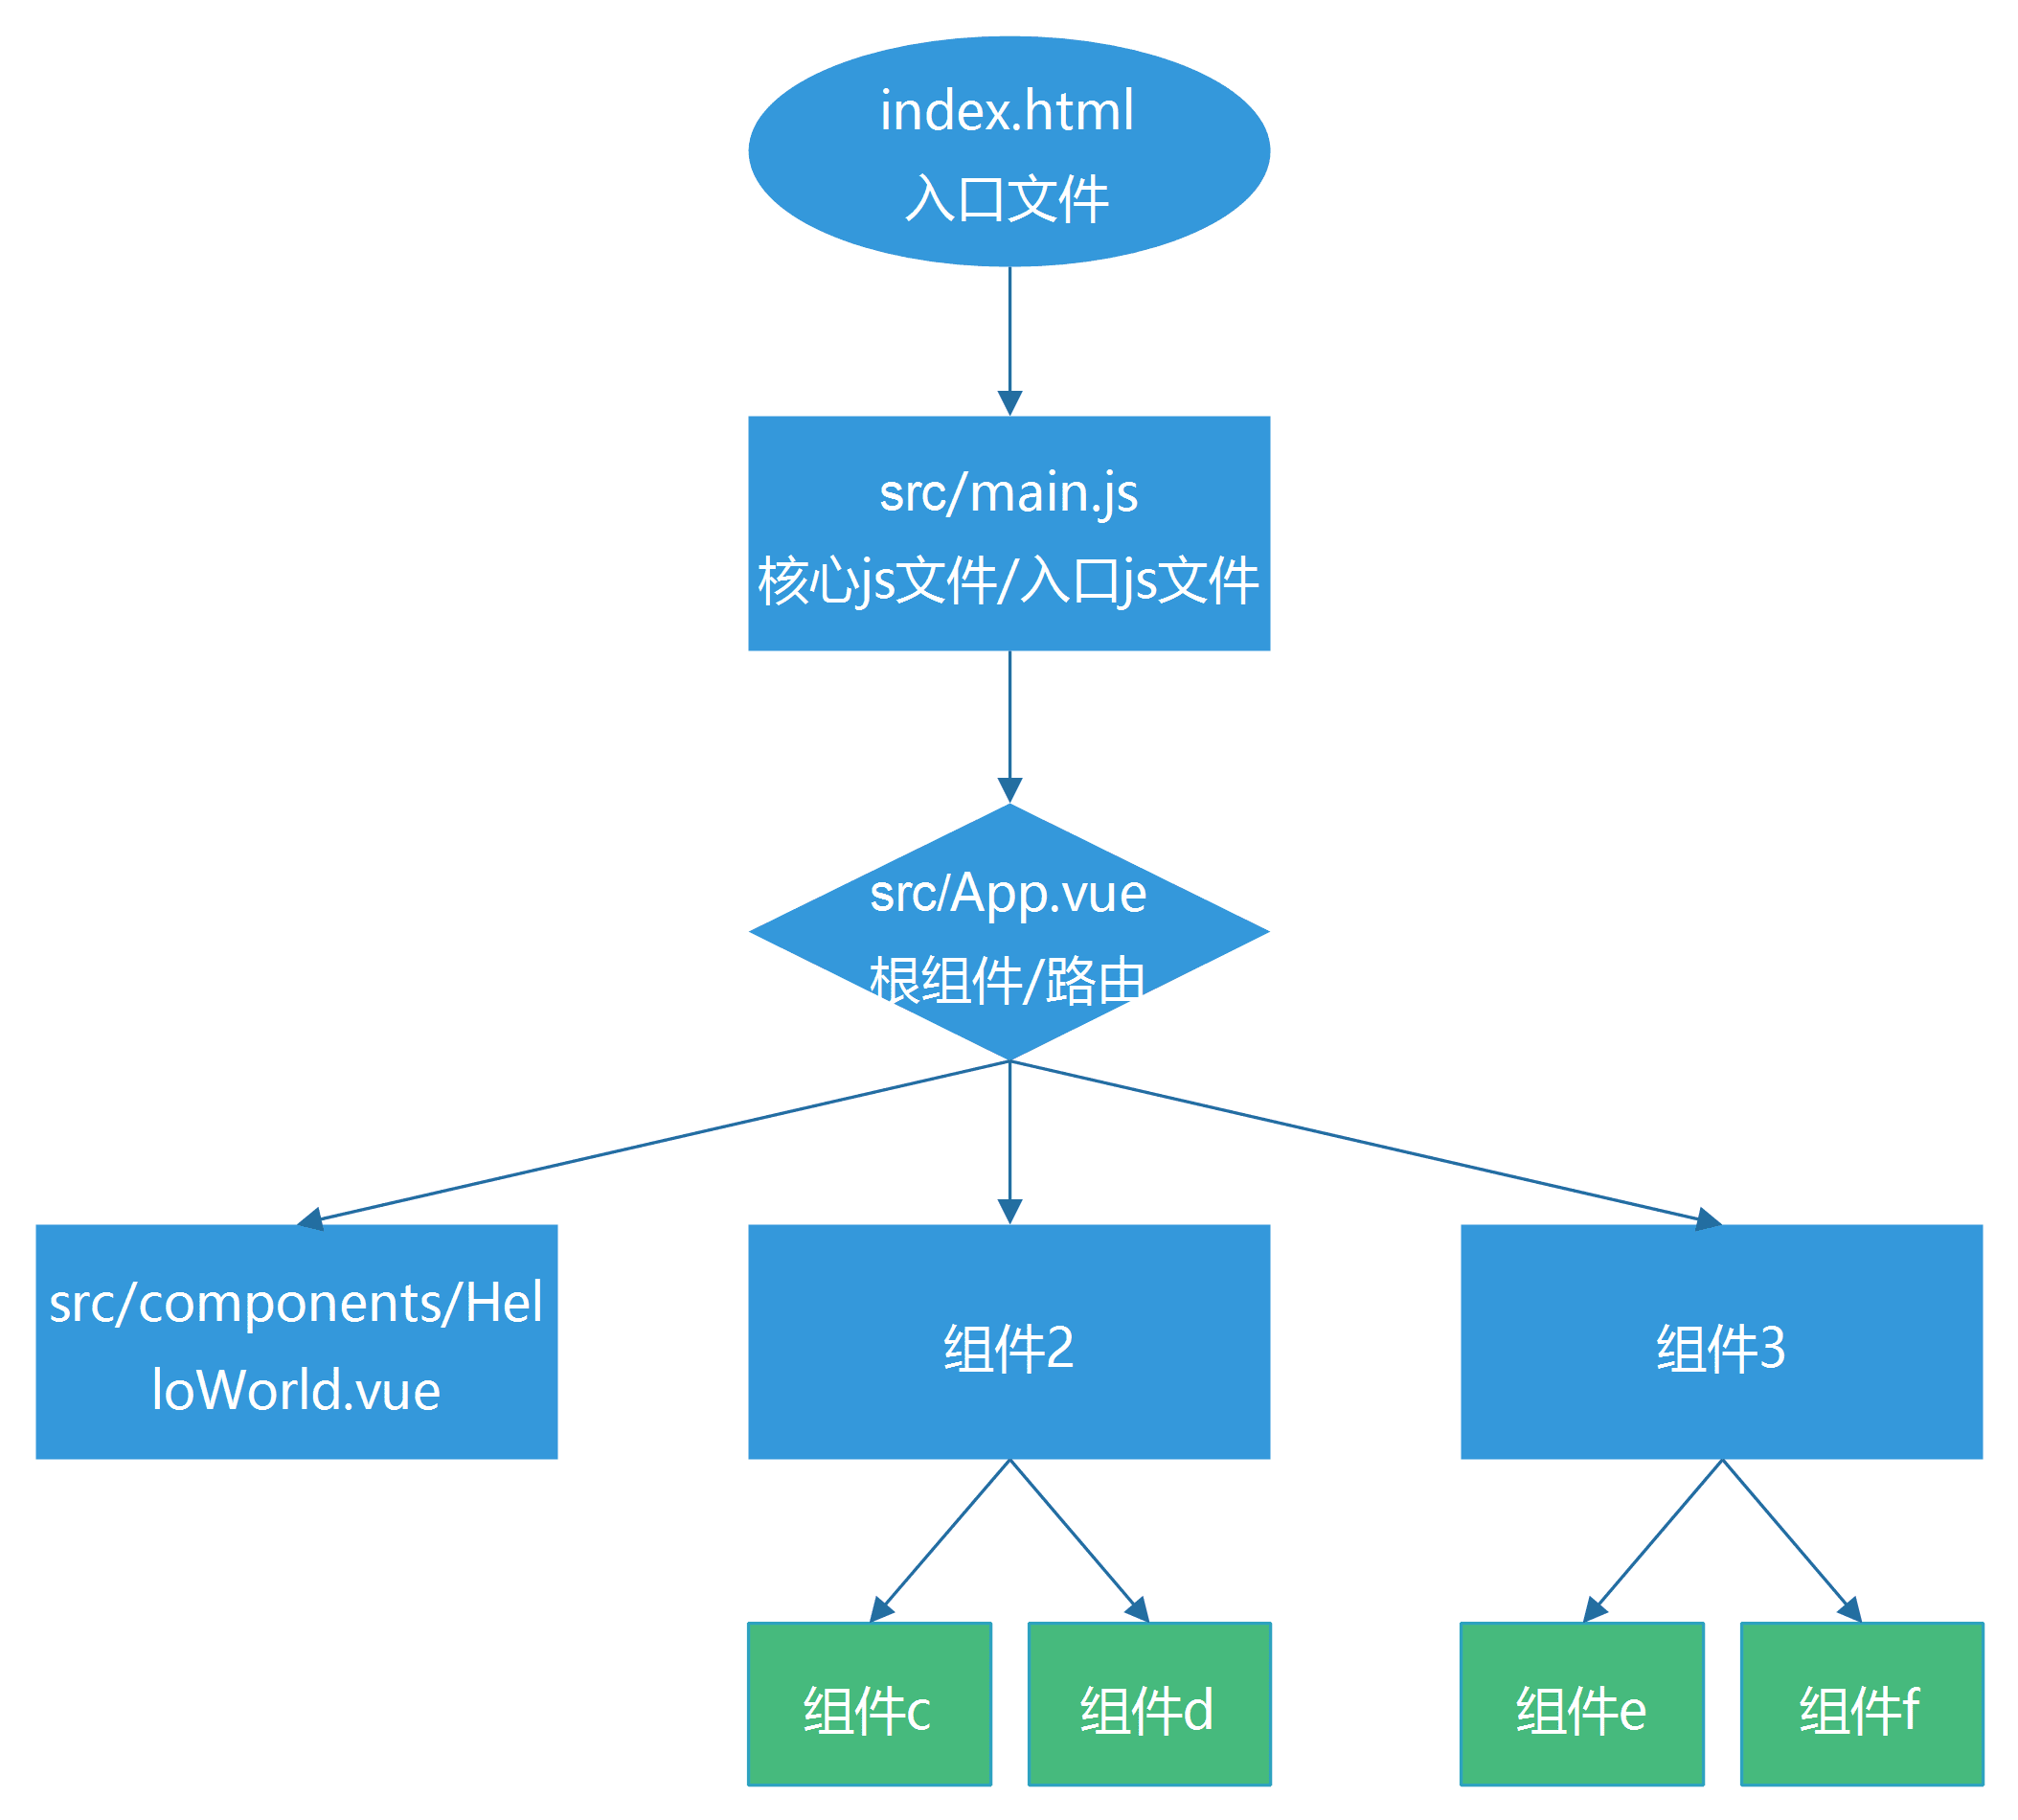
如上图所示,我们浏览器访问http://localhost:8080/时:
- 返回是项目目录下的
index.html文件,这个文件定义了HTML元素,而且这个文件也是全部唯一的。 - 然后
src/main.js也被加载:- 导入
node_modules/vue包,这个包内有vue的核心文件。 - 导入同级目录的
App.vue文件,这个文件同样导入了src/components/HelloWorld.vue组件。注意,这个App.vue是全局唯一的。 - 创建vue对象并绑定元素和组件。
- 导入
- 层层嵌套后,
src/components/HelloWorld.vue组件被加载到项目目录下的index.html文件中,然后前端展示内容。
先来看index.html,这个文件倒没啥,只是定义了一个div标签,然后创建了id属性。
<!DOCTYPE html>
<html>
  <head>
    <meta charset="utf-8">
    <meta name="viewport" content="width=device-width,initial-scale=1.0">
    <title>vuedemo1</title>
  </head>
  <body>
    <div id="app"></div>
    <!-- built files will be auto injected -->
  </body>
</html>然后再来看src/main.js文件:
/*
vue中的导包方式
import 对象/类 from "目录路径"
在vue中导包时,如果文件后缀是.js或者.vue,可以不用加后缀
另外,import后的名字可以自定义,比如 import xxx from 'vue'
*/
import Vue from 'vue'   // 导入的是node_modules中的vue包
import App from './App'  // 相对路径导入

Vue.config.productionTip = false;
/*
开发模式:npm run dev是前端自己开发用的
生产模式:npm run build 打包之后给后端放在服务端上用的
Vue.config.productionTip = false
上面这行代码的意思 是阻止显示生产模式的消息。
如果没有这行代码,或者设置为true,控制台就会多出这么一段代码。

You are running Vue in development mode.
Make sure to turn on production mode when deploying for production.
*/

/* eslint-disable no-new */
new Vue({
  el: '#app',  // vue对象绑定HTML元素
  components: { App },  // 加载组件
  template: '<App/>'
});再来看src/App.vue文件:
<template>
  <!-- template中有且只能有一个子标签,组件所有的HTML代码都必须包含在这个子标签中 -->
  <div id="app">
    <img src="./assets/logo.png">
    <HelloWorld/> <!-- 导入src/components/HellWorld组件 -->
    <!-- 导入组件有两种展示方式 -->
    <!-- 1. 直接写一个标签 <HelloWorld/> -->
    <!-- 2. 使用闭合标签 <HellWorld><HelloWorld/> -->
  </div>
</template>

<script>
// App.vue也是一个组件,在script标签编写vue代码
// 从src/components/目录中,加HelloWorld组件
import HelloWorld from './components/HelloWorld'

// 想要让当前组件生效,必须使用export关键字抛出当前组件对象,否则无法生效
export default {
  name: 'App',  // 当前组件的组件名
  components: {  // 在当前组件中加载别的组件
    HelloWorld
  }
}
</script>

<style>
/*
在style中编写css样式代码。
注意:
    直接在style中编写的代码会应用到全局中,也就是作用于整个HTML文档
    如果只是需要作用于当前组件中,在style标签添加scoped属性,如<style scoped>
*/
#app {
  font-family: 'Avenir', Helvetica, Arial, sans-serif;
  -webkit-font-smoothing: antialiased;
  -moz-osx-font-smoothing: grayscale;
  text-align: center;
  color: #2c3e50;
  margin-top: 60px;
}
</style>至于src/components/HelloWorld组件文件,跟App.vue组件格式一致,这里不在多表,但它们都有共同特征,即单文件组件,主要包含三部分:
<template>
<!-- 编写HTML代码 -->
</template>

<script>
/* 编写vue代码 */
</script>

<style scoped>
/* 定义当前组件的css样式 */
</style>下图是vue项目的执行流程图:
PyCharm的相关配置
win10 + PyCharm2019.1.4
我这里使用的是PyCharm,所以,这里再介绍下PyCharm中关于vue的相关配置。
配置一键运行vue项目
如果你用PyCharm开发过Django,我想,你肯定习惯了点击运行按钮,一键运行项目吧。
这里我们也可以配置点击运行按钮,一键运行vue项目,也就是不用每次都手动的npm run dev了。
第一步,添加一个npm的配置。
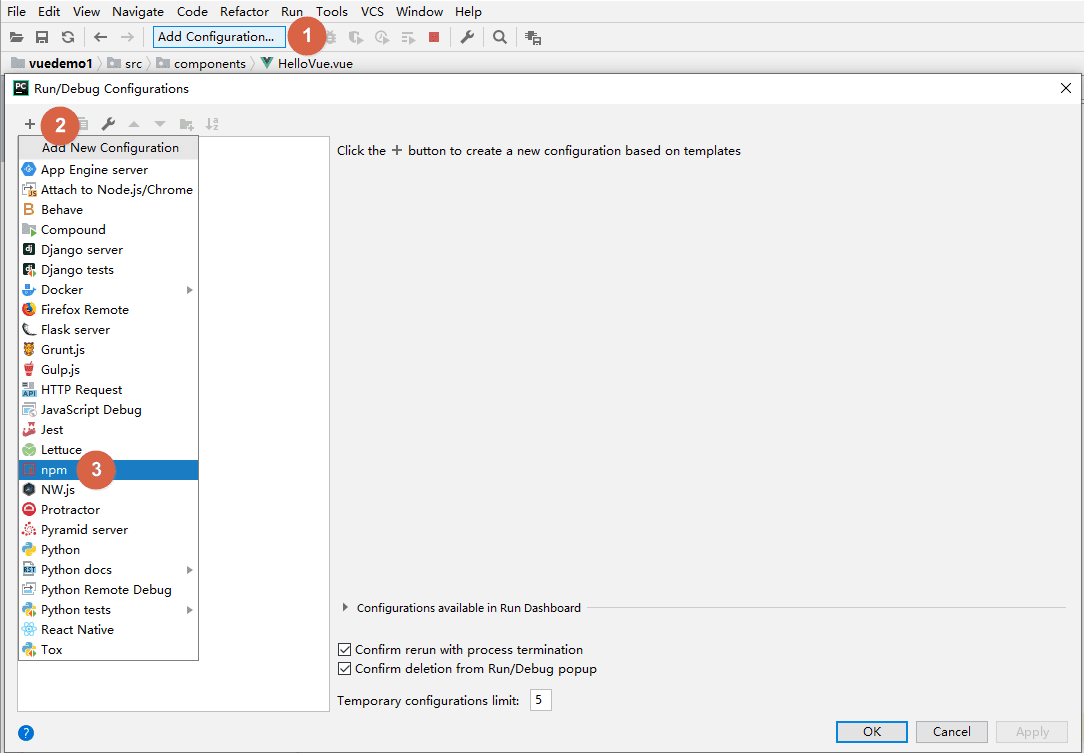
第二步,在scripts选项中填写dev。
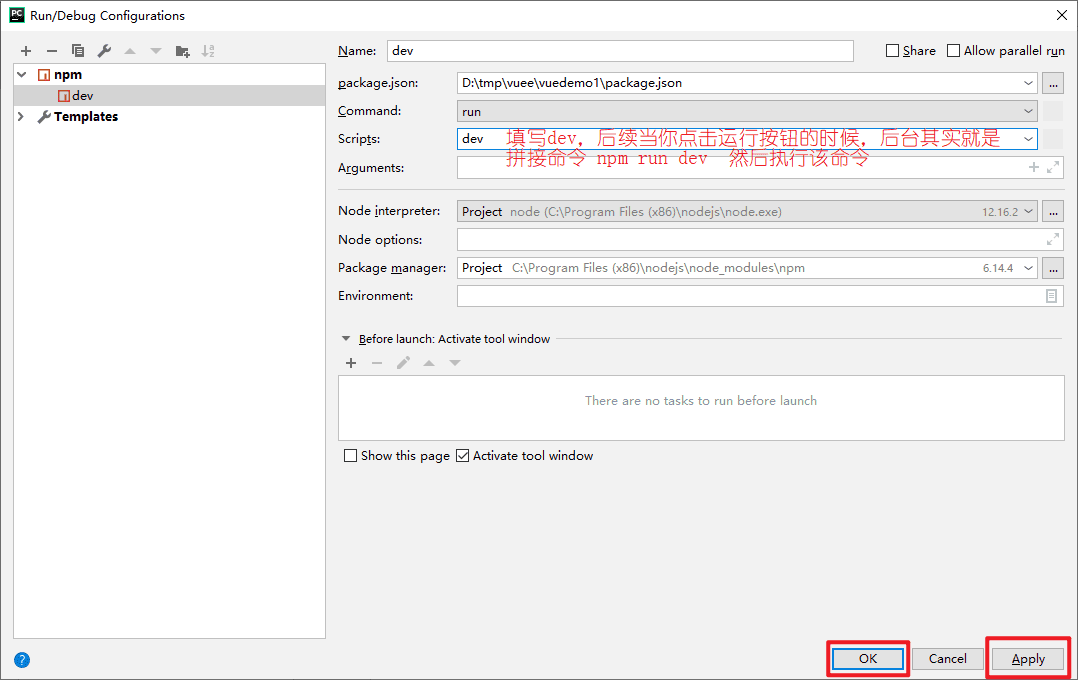
完事就可以愉快的玩耍了。
自定义ip和port
npm run serve之后,默认监听的是8080,如果想自定义的话,有两种办法。
1. 项目根目录下的vue.config.js文件(没有就创建)编写。用的多
module.exports = {
    devServer: {
        host: "127.0.0.1",  //指定要使用的 host
        port: 80,   //指定端口号以侦听
        hotOnly: false, //启用热模块替换,而无需页面刷新作为构建失败时的回退。
    },
};2. 项目根目录下的webpack.config.js文件(没有就创建)编写,用得少
module.exports = {
    devServer: {
        host: "127.0.0.1",  //指定要使用的 host
        port: 80,   //指定端口号以侦听
        hotOnly: false, //启用热模块替换,而无需页面刷新作为构建失败时的回退。
    },
};参考:https://blog.csdn.net/meis27461/article/details/111695097
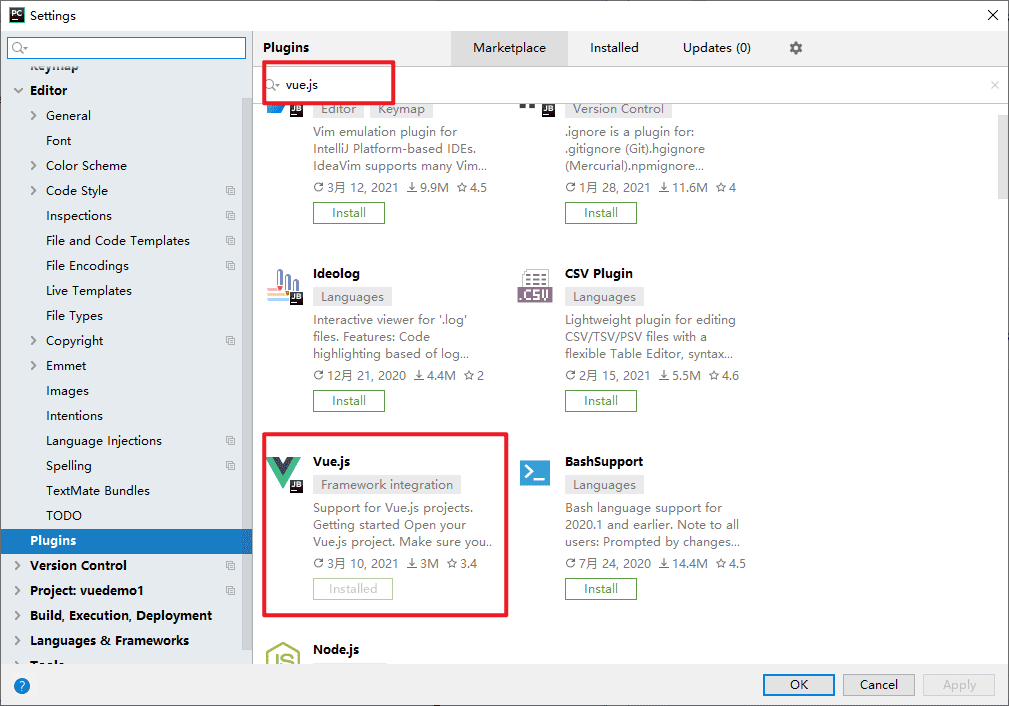
下载vue.js插件
如果vue相关代码没有高亮,说明缺少插件,你可以settings>plugins,搜索vue.js并安装,然后重启ide。
单文件组件
了解了vue项目创建、运行、执行流程后,我们可以来学习单文件组件相关的内容了。
在src/components目录中,你会发现有一个提前创建好的单文件组件HelloWorld.vue(组件以.vue结尾)。
我们参照这个组件再创建一个HelloVue.vue,加深各个环节的理解。
PyCharm中new>vue component,就能创建一个以.vue结尾的组件文件 。
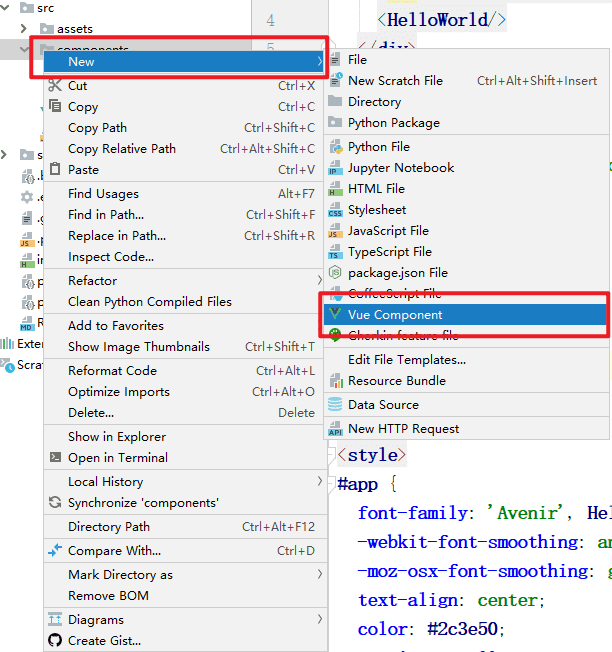
这里的组件命名规范推荐使用驼峰体。
然后编写组件HelloVue.vue内容:
<template>
    <div>{{ greeting }} Vue!</div>
</template>

<script>
    // 想要该组件能被vue对象加载,必须使用export default声明
    export default {
        name: "HelloVue",
        data(){  // 数据要以data方法的形式return出去
          return {
            greeting: "Hello"
          }
        }
    }
</script>

<style scoped>
div{
  font-size: 20px;
  color: orange;
}
</style>现在,组件写好了,我们怎么才能在浏览器中看到呢?这还需要做一些配置。
在src/App.vue组件中导入HelloVue组件,src/App.vue代码:
<template>
  <div id="app">
<!--    <img src="./assets/logo.png">-->
<!--    <HelloWorld/>-->
    <HelloVue></HelloVue>  <!-- 引入组件 -->
  </div>
</template>

<script>
// import HelloWorld from './components/HelloWorld'
import HelloVue from './components/HelloVue'

export default {
  name: 'App',
  components: {
    // HelloWorld,
    HelloVue
  }
}
</script>

<style>
/*#app {*/
/*  font-family: 'Avenir', Helvetica, Arial, sans-serif;*/
/*  -webkit-font-smoothing: antialiased;*/
/*  -moz-osx-font-smoothing: grayscale;*/
/*  text-align: center;*/
/*  color: #2c3e50;*/
/*  margin-top: 60px;*/
/*}*/
</style>至于index.html和src/main.js文件则无需改动,现在可以尝试浏览器访问了:

组件的嵌套
在前端开发中,往往会编写大量的组件,而通常,大组件代表就是页面;然后大组件中引入小组件,实现页面中的某个功能。
来看下组件嵌套中的一些细节。
现在有组件Nav.vue,位于src/components/common目录内。
├── src/
│   ├── components/
│	│	├── common			# 公共组件目录
│	│	│	└── Nav.vue		# 导航条组件
│	│	├── HelloVue.vue
│   │	└── HelloWorld.vue
├── App.vue
└── main.js我们想要在HelloVue.vue组件内引用嵌套在common内的Nav.vue组件,怎么办?
首先,Nav.vue组件:
<template>
    <div>
        导航条
    </div>
</template>
<script>
    export default {
        name: "Nav"
    }
</script>
<style scoped>
div{
  height: 30px;
  background-color: bisque;
  text-align: center;
}
</style>再来看HelloVue.vue组件内该怎么引用:
<template>
    <div>
        <!--  3. 使用组件 -->
        <Nav></Nav>
        <p>{{ greeting }} Vue!</p>
    </div>
</template>
<script>
    // 1. 导入组件
    // 下面两种导入方式都可以
    // import Nav from "./common/Nav"
    import Nav from "../components/common/Nav"
    export default {
        name: "HelloVue",
        data(){  // 数据要以data方法的形式return出去
          return {
            greeting: "Hello"
          }
        },
        components:{ Nav }   // 2. 注册子组件 Nav
    }
</script>
<style scoped>
div{
  font-size: 20px;
  color: orange;
}
</style>其他文件内容不变。
组件的嵌套,跟俄罗斯套娃一个套路,非常简单。
组件间的数据传递
各组件之间是隔离的,那么问题来了,我们通常有需求需要在不同组件中进行数据交互,那到底该怎么实现呢?一起来看看。
通常组件间的数据共享:
- 父>子传递数据,即外部组件向内部组件传值。
- 子>父传递数据,即内部组件向外部组件传值。
- 兄弟组件之间数据相互传值。
分别来看。
父>子之间传递数据
也就是外部组件向内部组件传递数据,通常有几个步骤:
- 父组件能正常加载子组件。
- 父组件中,定义数据,然后将数据以自定义属性的方式绑定到子组件的标签上。
- 子组件,声明props数据,在数组内接收父组件传来的属性。
- 然后在子组件内,引用属性,渲染时会自动的取出属性对应的值,完成数据传递。
这里我们演示HelloVue.vue父组件向子组件Nav.vue传递数据。
首先父组件:
<template>
    <div>
        <!--  以属性绑定到组件上,属性的值就是要传递的数据 -->
        <Nav :mytitle="msg" :mycontent="content"></Nav>
        <p>{{ greeting }} Vue!</p>
    </div>
</template>

<script>

    import Nav from "../components/common/Nav"
    export default {
        name: "HelloVue",
        data(){
          return {
            greeting: "Hello",
            msg:"儿子",
            content:"粑粑来看你了!!!"
          }
        },
        components:{ Nav }   // 2. 注册子组件 Nav
    }
</script>

<style scoped>
div{
  font-size: 20px;
  color: orange;
}
</style>子组件:
<template>
    <div>
        导航条
        <span>{{mytitle}},{{mycontent}}</span>
    </div>
</template>

<script>
    export default {
        name: "Nav",
        props:["mytitle", "mycontent"]  // 使用props数组来接收父组件传来的数据,这就相当于在data中定义了两个属性
    }
</script>

<style scoped>
div{
  height: 30px;
  background-color: bisque;
  text-align: center;
}
</style>子>父之间传递数据
也就是子组件向父组件之间传递数据。通常有以下几个步骤:
- 子组件中,当数据被修改时,通过
this.$emit()方法将数据传递给父组件。 - 父组件中,调用子组件的标签位置上的自定义事件来接收,并为自定义事件绑定父组件自定义方法。
- 在父组件中,通过自定义方法,接收来自子组件的数据。
这里我们演示子组件Nav.vue向HelloVue.vue父组件传递数据。
首先是子组件:
<template>
    <div>
        导航条
        <span>{{mytitle}},{{mycontent}}</span>
        <input type="text" v-model="num">
        <button @click="add">+</button>
    </div>
</template>

<script>
    export default {
        name: "Nav",
        props:["mytitle", "mycontent"],  // 使用props数组来接收父组件传来的数据,这就相当于在data中定义了两个属性
        data(){
            return {
                msg:"粑粑",
                content: "儿子来看你了",
                num: 0
            }
        },
        methods:{
            add(){
              this.num++;
            }
        },
        watch:{
            num(){
              // this.$emit("父组件的自定义事件名", 要传递参数1,要传递的参数2,.....)
              this.$emit('son', this.msg, this.content, this.num)
            }
        }
    }
</script>

<style scoped>
div{
  height: 30px;
  background-color: bisque;
  text-align: center;
}
</style>接着是父组件:
<template>
    <div>
        <!--  @son是子组件this.$emit方法的第一个参数,然后子组件将数据给@son指定的自定义方法进行接收 -->
        <Nav :mytitle="msg" :mycontent="content"   @son="son_event"></Nav>
        <p>{{ greeting }} Vue!</p>
        <p>{{son_msg}},{{son_content}}, 来自子组件的num数据:{{son_num}}</p>
    </div>
</template>

<script>

    import Nav from "../components/common/Nav"
    export default {
        name: "HelloVue",
        data(){
          return {
            greeting: "Hello",
            msg:"儿子",
            content:"爸爸来看你了!!!",
            son_msg: "",
            son_content: "",
            son_num: "",
          }
        },
        components:{ Nav },   // 2. 注册子组件 Nav
        methods:{
            son_event(son_msg, son_content, son_num){
                this.son_msg=son_msg;
                this.son_content=son_content;
                this.son_num=son_num;
            }
        }
    }
</script>

<style scoped>
div{
  font-size: 20px;
  color: orange;
}
</style>组件中的axios使用
默认情况下,vue项目也没有内置axios,所以,想要使用通常需要3步:
- 需要手动下载axios。
- 将axios对象绑定到vue对象上。
- 在需要的地方使用就好了。
install
在项目根目录下,打开终端执行:
npm install axios

D:\tmp\vuee\vuedemo1>npm install axios
npm WARN ajv-keywords@3.5.2 requires a peer of ajv@^6.9.1 but none is installed. You must install peer dependencies yourself.
npm WARN optional SKIPPING OPTIONAL DEPENDENCY: fsevents@2.3.2 (node_modules\fsevents):
npm WARN notsup SKIPPING OPTIONAL DEPENDENCY: Unsupported platform for fsevents@2.3.2: wanted {"os":"darwin","arch":"any"} (current: {"
os":"win32","arch":"x64"})
npm WARN optional SKIPPING OPTIONAL DEPENDENCY: fsevents@1.2.13 (node_modules\watchpack-chokidar2\node_modules\fsevents):
npm WARN notsup SKIPPING OPTIONAL DEPENDENCY: Unsupported platform for fsevents@1.2.13: wanted {"os":"darwin","arch":"any"} (current: {
"os":"win32","arch":"x64"})
npm WARN optional SKIPPING OPTIONAL DEPENDENCY: fsevents@1.2.13 (node_modules\webpack-dev-server\node_modules\fsevents):
npm WARN notsup SKIPPING OPTIONAL DEPENDENCY: Unsupported platform for fsevents@1.2.13: wanted {"os":"darwin","arch":"any"} (current: {
"os":"win32","arch":"x64"})

+ axios@0.21.1
added 1 package from 1 contributor and audited 1281 packages in 18.065s

46 packages are looking for funding
  run `npm fund` for details

found 17 vulnerabilities (3 low, 8 moderate, 6 high)
run `npm audit fix` to fix them, or `npm audit` for details下载成功后,该axios包就被保存在了node_module目录中。
绑定axios到vue对象上
需要在src/main.js中完成操作:
import Vue from 'vue'   // 导入的是node_modules中的vue包
import App from './App'  // 相对路径导入

// 1. 导入axios组件,导入ode_modules中的包直接导包名即可
// 2. 把axios对象作为一个属性绑定到vue对象上
import axios from "axios"
Vue.prototype.$axios = axios;

Vue.config.productionTip = false;

new Vue({
  el: '#app',
  components: { App },
  template: '<App/>'
});然后,就可以在组件中使用axios了。
这里为了省事儿,我们直接在App.vue组件中来完成示例:
<template>
    <div id="app">
        <h3>输入城市名称获取未来5天的天气情况</h3>
        <input type="text" v-model="city" value="city"><button @click="get_weather">获取</button>
        <div>
            	<p>{{city}}未来5天的天气情况如下: </p>
          	<ul v-for="item,index in li_list">
            	<li>{{item}}</li>
          	</ul>
        </div>
    </div>
</template>

<script>

import HelloVue from './components/HelloVue'

export default {
    name: 'App',
    data(){
      return {
        city:"北京",
        li_list: ""
      }
    },
    methods:{
        get_weather(){
            // 通过 this.$axios调用axios功能
            this.$axios.get("http://wthrcdn.etouch.cn/weather_mini",{
                params:{"city": this.city}
            }).then(response=>{
                console.log(response.data);
                console.log(response.data["data"]["forecast"]);
                this.li_list = response.data["data"]["forecast"];
            }).catch(error=>{
                console.log(error);
            })
        }
    },
    components: {
      // HelloWorld,
      HelloVue
    }
  }
</script>
<style>
</style>动态组件component
路由
vue router官网:https://router.vuejs.org/zh/
vue touter手册:https://router.vuejs.org/zh/installation.html
摘自官网:
Vue Router 是 Vue.js 官方的路由管理器。它和 Vue.js 的核心深度集成,让构建单页面应用变得易如反掌。包含的功能有:
- 嵌套的路由/视图表
- 模块化的、基于组件的路由配置
- 路由参数、查询、通配符
- 基于 Vue.js 过渡系统的视图过渡效果
- 细粒度的导航控制
- 带有自动激活的 CSS class 的链接
- HTML5 历史模式或 hash 模式,在 IE9 中自动降级
- 自定义的滚动条行为
install
如果在构建vue项目的时候,没有选择自动安装vue router,我们也可以通过npm命令单独安装:
# 命令简写形式
npm i vue-router@3 -S   # -S表示以压缩形式保存
# npm install vue-router@3 --save然后它被安装到了项目的node_module目录中了。
接下来就要说如何使用vue router,无非也就是学习两点:
- 导入路由组件,实例化路由对象,将路由对象绑定到vue对象上。
- 学习路由提供的功能。
配置路由
想要使用路由,要在下面三个文件中配置:
src/router/index.js中引入路由对象并注册到Vue中,然后在这个文件中编写路由规则src/main.js导入src/router/index.js核心文件,并挂载到全局的Vue对象中。src/App.uve调用路由组件。
一些必要的准备,在src/components目录下创建三个组件,用于示例演示。
src/components/Login.vue:
<template>
    <div>
        <h1>login组件</h1>
    </div>
</template>
<script>
    export default {
        name: "Login"
    }
</script>
<style scoped>
</style>src/components/Home.vue:
<template>
    <div>
        <h1>home组件</h1>
    </div>
</template>
<script>
    export default {
        name: "Home"
    }
</script>
<style scoped>
</style>src/components/Back.vue:
<template>
    <div>
        <h1>back组件</h1>
    </div>
</template>
<script>
    export default {
        name: "Back"
    }
</script>
<style scoped>
</style>初始化路由对象
这里需要在src目录下创建一个router目录,然后在router目录中创建一个index.js文件,它是路由的核心文件。
我们在src/router/index.js文件中编写初始化路由的代码:
// 1. 引入vue和vue-router组件
import  Vue from "vue";
import Router from "vue-router";

// 2.为Vue对象注册vue-router组件对象
Vue.use(Router);

// 导入组件
// 在vue中,@表示src目录的路径
// import Home from "../components/Home"
import Home from "@/components/Home";
import Login from "@/components/Login";
import Back from "@/components/Back";

// 3. 构建并抛出vue-router对象,这一步非常重要!!!
export default new Router({
    /*
    * 设置路由模式,默认模式为hash,vue-router提供了两种路由模式,路径显示有点区别
    *   hash:    http://localhost:8080/#/back
    *   history: http://localhost:8080/back
    * */
    mode:"history",
    /*
    * 路由(列表)表,在路由列表中编写路由规则,这些路由规则后续会提供给main.js调用
    * 路由表中,每个路由规则都是一个字典,每个字典有三个值:
    * {
    *   name:"路由名称[对应组件的name值,将来用于跳转页面]",  // name属性相当于Django的路由别名,可以省略不写,但建议写上,跟组件名保持一致即可
    *   path:"访问的url",
    *   component: 组件名
    * }
    * */
    routes:[
        {
            path:"/home",
            component:Home,
            name:"Home"
        },
        {
            path:"/login",
            component:Login,
            name:"Login"
        },
        {
            path:"/back",
            component:Back,
            name:"Back"
        },
    ]
})注册路由
src/main.js:
import Vue from 'vue'
import App from './App'

// 导入编写的路由核心文件
import router from "@/router/index"

Vue.config.productionTip = false;

new Vue({
    el: '#app',
    router,  // 挂载路由,挂载后,全局就都可以使用路由组件
    components: { App },
    template: '<App/>'
});调用路由组件
这一步,就是让路由组件在vue项目中生效,src/App.vue:
<template>
    <div id="app">
        <!-- 调用路由组件 -->
        <!-- 路由组件的作用:识别访问当前站点的url地址,获取地址路径 -->
        <router-view></router-view>
    </div>
</template>
<script>
export default {
    name: 'App',
    components: {}
  }
</script>
<style>
</style>注意:如果在vue创建项目的时候,设置安装vue-router,则项目会自动帮我们生成上面的router目录和index.js里面的代码,以及自动到main.js里面注册路由对象。
路由对象提供的操作
当路由配置成功后,我们可以在全局使用vue-router组件提供的两个路由对象:
this.$router:用于在js代码中进行页面跳转。this.$route:用户获取地址栏中的url参数。
更多关于路由的API参考:https://router.vuejs.org/zh/api/
页面跳转
Vue中,站内跳转,通常:
- 使用
this.@router来跳转。 - 使用
router-link来跳转。
来看示例,src/components/Home.vue:
<template>
    <div>
        <h1>Home组件</h1>
        <h3>页面跳转那些事</h3>
        <p><button @click="jump">使用this.$router实现站内跳转到登录页</button></p>
        <p><router-link to="/login">使用router-link来跳转,普通方式to="/login",router-link实际上个a标签,但本质上是ajax跳转,to等同于href</router-link></p>
        <p><router-link :to="url">使用router-link来跳转,但是以变量的形式 :to="url"</router-link></p>
        <p><router-link :to="{name:'Login'}">使用router-link来跳转,但是以变量的形式:to="{name:'Login'}",且使用路由别名,即指向路由表中的name属性</router-link></p>
        <p><router-link :to="{path:'/login'}">使用router-link来跳转,但是以变量的形式:to="{path:'/login'}",且使用路由变量解析,即指向路由表中的path属性</router-link></p>
        <p><a href="/login">原生a标签跳转,但会刷新页面,不推荐使用</a></p>
        <br>
    </div>
</template>

<script>
    export default {
        name: "Home",
        data(){
            return {
                url:"/login"
            }
        },
        methods:{
            jump(){
                // console.log(this.$router.mode);  // 当前路由的模式: history
                // console.log(this.$router.currentRoute);  // 当前路由路径 /home
                /*
                * 跳转页面可以使用this.$router, 但该方法只允许站内跳转,另外,这种跳转是ajax局部刷新跳转
                * 如果需要跳转到其他网站,需要使用js原生的window.location.href = "https://www.baidu.com"
                * */
                this.$router.push('/login'); // '/login' 对应的是路由表中路由的path参数
                /*
                * 当 n 为正整数时,前进 n 页
                * 当 n 为负整数时,后退 n 页
                * */
                // this.$router.go(n);
                // this.$router.forward();  // 前进一页
                // this.$router.back(); // 后退一页

            }
        }
    }
</script>
<style scoped>
</style>以上两种方式都是基于Ajax跳转,效果很好,不要使用原生的a标签,会刷新页面。
捕获所有路由或 404 Not found 路由
默认的,访问一个不存在的路径,vue不会报错,只会返回一个空白页面,而这里要做的是当访问下面这些路径时,能有正确的反馈:
http://localhost:8080/		# 访问根路径,希望返回主页
http://localhost:8080/xxoo # 访问不存在的路径,希望返回自定义的404页面中去配置一个404组件,我这里叫做src/components/Page404.vue:
<template>
    <div>
        <h1>ERROR,PAGE NOT FOUND</h1>
        <button @click="go">go home</button>
    </div>

</template>

<script>
    export default {
        name: "PageNotFount",
        methods:{
            go(){
                this.$router.push("/home")
            }
        }
    }
</script>

<style scoped>
h1 {
    color: red;
}
</style>配置路由表:
// 1. 引入vue和vue-router组件
import  Vue from "vue";
import Router from "vue-router";

// 2.为Vue对象注册vue-router组件对象
Vue.use(Router);

// 导入组件
// 在vue中,@表示src目录的路径
// import Home from "../components/Home"
import Home from "@/components/Home";
import Login from "@/components/Login";
import Back from "@/components/Back";
import PageNotFount  from "@/components/Page404";


// 3. 构建并抛出vue-router对象,这一步非常重要!!!
export default new Router({
    mode:"history",
    routes:[
        {
            path:"/home",
            component:Home,
            name:"Home"
        },
        {
            path:"/login",
            component:Login,
            name:"Login"
        },
        {
            path:"/back",
            component:Back,
            name:"Back"
        },
        {
            path:"/",
            component:Home,
            name:"Home"
        },
        {  							// 注意,必须将通配符放到路由表的最后面
            path:"*",
            component:PageNotFount,
            name:"PageNotFount"
        }
    ]
})路由参数传递
vue-router组件提供了this.$route,可以让我们接收来自其他页面通过路由携带的参数,通常有两种方式传递参数:
查询字符串(query string),也就是地址栏后
?后跟的参数。例如:
http://localhost:8008/user?name=xiaoming&age=18,这里name=xiaoming&age=18就是查询字符串参数。路由参数(router params),就是地址栏中路径的一部分。
例如:
http://localhost:8080/user/300,此时,数据300属于路由路径的一部分,然后我们需要从路径中把它提取出来。
传递参数有两种,但接收参数就一种,那就是使用this.$route.query来完成。
查询字符串
这里我们从home向login组件传值作为演示。
src/components/Home.vue:
<template>
    <div>
        <h1>Home组件</h1>
        <h3>传递参数那些事——查询字符串</h3>
        <button @click="jump">通过this.$router.push传参</button>
        <br>
        <router-link to="/login?k1=v1&k2=v2">使用router-link来跳转 to="/login?k1=v1&k2=v2"</router-link>
        <br>
        <router-link :to="{path:'/login', query:{'k3':'v3', 'k4':'v4'}}">使用router-link来跳转:to="{path:'/login', query:{'k3':'v3', 'k4':'v4'}}"</router-link>
        <br>
        <router-link :to="{name:'Login', query:{'k5':'v5', 'k6':'v6'}}">使用router-link来跳转:to="{name:'Login', query:{'k5':'v5', 'k6':'v6'}}"</router-link>
        <br>

    </div>
</template>
<script>
    export default {
        name: "Home",
        data(){
            return {
                url:"/login"
            }
        },
        methods:{
            jump(){
                this.$router.push('/login?k1=v1&k2=v2');
            }
        }
    }
</script>
<style scoped>
</style>src/components/Login.vue:
<template>
    <div>
        <h1>login组件</h1>
        <h3>接收到来自home页面的查询字符串参数</h3>
        <p>{{msg}}</p>
    </div>
</template>
<script>
    export default {
        name: "Login",
        data(){
            return {
                msg: ""
            }
        },
        created() {
            // 接收路由参数,都统一由this.$route.query完成
            // console.log(this.$route.query);  // {k1: "v1", k2: "v2"}
            // console.log(this.$route.query.k1);  // v1
            // console.log(this.$route.query.k2);  // v2
            this.msg = this.$route.query;
            // 其他方法
            // console.log(this.$route.fullPath);  // /login?k1=v1&k2=v2
            // console.log(this.$route.matched); // 一个数组,包含当前路由的所有嵌套路径片段的路由记录
            // console.log(this.$route.name);   // 当前路由的名称,如果有的话。
            // console.log(this.$route.params);  // 一个 key/value 对象,包含了动态片段和全匹配片段,如果没有路由参数,就是一个空对象。
            // console.log(this.$route.path); // 不带参数的路由路径 /login
            // 更多参数参考: https://router.vuejs.org/zh/api/#%E8%B7%AF%E7%94%B1%E5%AF%B9%E8%B1%A1

        }
    }
</script>
<style scoped>
</style>接收路由参数
https://router.vuejs.org/zh/guide/essentials/dynamic-matching.html
我们经常需要把某种模式匹配到的所有路由,全都映射到同个组件。例如,我们有一个 User 组件,对于所有 ID 各不相同的用户,都要使用这个组件来渲染。那么,我们可以在 vue-router 的路由路径中使用“动态路径参数”(dynamic segment) 来达到这个效果。
src/router/index.js:
// 1. 引入vue和vue-router组件
import  Vue from "vue";
import Router from "vue-router";

// 2.为Vue对象注册vue-router组件对象
Vue.use(Router);

// 导入组件
// 在vue中,@表示src目录的路径
// import Home from "../components/Home"
import Home from "@/components/Home";
import User from "@/components/User";


// 3. 构建并抛出vue-router对象,这一步非常重要!!!
export default new Router({
    mode:"history",
    routes:[
        {
            path:"/user/:user_id",
            component:User,
            name:"User"
        },
        {
            path:"/home",
            component:Home,
            name:"Home"
        }
    ]
})src/components/Home.vue:
<template>
    <div>
        <h1>Home组件</h1>
        <h3>传递参数那些事——路由参数</h3>
        <router-link to="/user/123">使用router-link传递路由参数  to="/user/123"</router-link>
    </div>
</template>

<script>
    export default {
        name: "Home",
        data(){
            return {
                url:"/login"
            }
        }
    }
</script>
<style scoped>
</style>现在我们借助一个新的组件,src/components/User.vue:
<template>
    <div>
        <h1>User组件</h1>
        <h3>接收到来自home页面的路由参数</h3>
        <p>{{msg}}</p>
    </div>
</template>

<script>
    export default {
        name: "User",
        data(){
            return {
                msg: ""
            }
        },
        created() {
            this.msg = this.$route.params;
            console.log("this.$route.params: ", this.$route.params);  // { "user_id": "123" }
            console.log("this.$route.params: ", this.$route.params.user_id);  // 123
        }
    }
</script>
<style scoped>
</style>除了上面演示的使用方式之外,如果你有多个路由参数值需要传递,你需要这样:
| 路由表的path | router-link | this.$route.params |
|---|---|---|
/user/:user_id/post/:post_id | /user/123/post/234 | { "user_id": "123", "post_id": "234" } |