before
由于各种webpack、vite的不同,加上vue2和vue3也有所不同,导致创建vue项目的命令有好几种。
那么目录结构也有些细微的变化,导致引入jQuery的姿势也不同,所以我整理了一下各种引入jQuery的方式。
vue2和vue3通用:全局静态引入jQuery
这种方式vue2和vue3通用。
就是在项目根目录下找到index.html文件,在里面引入即可:
<!DOCTYPE html>
<html lang="en">
<head>
    <meta charset="UTF-8">
    <link rel="icon" href="/favicon.ico">
    <meta name="viewport" content="width=device-width, initial-scale=1.0">
    <title>Vite App</title>
    <!--  可以引入cdn  -->
<!--    <script src="https://cdn.bootcdn.net/ajax/libs/jquery/3.6.1/jquery.js"></script>-->
    <!--  也可以本地引入  -->
    <script src="/src/assets/jquery.js"></script>
</head>
<body>
<div id="app"></div>
<script type="module" src="/src/main.js"></script>
</body>
</html>来个示例App.vue:
<template>
    <div id="app">
        <div>
            <button @click="Click">点我</button>
            <p id="c1">是我</p>
        </div>
    </div>
</template>
<script>
export default {
    name: 'App',
    methods:{
        Click(){
            $("#c1").toggle()
        }
    }
}
</script>
<style>
</style>基于vue/cli:vue2引入jQuery
"vue": "^2.5.2" + "webpack": "^3.6.0"
引入分别局域引入和全局引入,但都需要先下载。
局部引入
1. 下载jQuery
npm install jquery --save2. 直接在组件中使用即可,这里以App.vue为例
<template>
    <div id="app">
        <div>
            <button @click="Click">点我</button>
            <p id="c1">是我</p>
        </div>
    </div>
</template>
<script>
// 1. 先导入jQuery
import $ from 'jquery'
export default {
    name: 'App',
    methods:{
        Click(){
            // 2. 直接在需要的地方直接使用即可
            $("#c1").toggle()
        }
    }
}
</script>
<style>
</style>将jQuery绑定到this对象上
1. 下载jQuery
npm install jquery --save2. 在main.js中将jQuery对象绑定到vue对象上,后续通过this来调用
import Vue from 'vue'
import App from './App'
// 导入jQuery
import $ from 'jquery'
Vue.config.productionTip = false

// 绑定到vue对象上
Vue.prototype.$ = $

/* eslint-disable no-new */
new Vue({
  el: '#app',
  components: { App },
  template: '<App/>'
})3. 在需要地方直接this.$使用,这里以App.vue为例
<template>
    <div id="app">
        <div>
            <button @click="Click">点我</button>
            <p id="c1">是我</p>
        </div>
    </div>
</template>
<script>
export default {
    name: 'App',
    methods:{
        Click(){
            // 通过this.$ 来调用jQuery
            this.$("#c1").toggle()
        }
    }
}
</script>
<style>
</style>全局引入:推荐
之所以推荐这么用,是因为如果你在项目中使用了bootstrap的话,只有这种方式最合适,因为这种方式相当于在全局直接就能用$,而bootstrap又必须依赖jQuery。
1. 下载jQuery
npm install jquery --save2. 在项目根目录下找到build/webpack.base.conf.js文件添加如下内容
这个项目我是通过vue init命令创建的项目,此时的vue-clie版本还是2.9.6,所以有这个build/webpack.base.conf.js文件,你如果找不到的话,就参考下面解决方案。
const config = require('../config')
const vueLoaderConfig = require('./vue-loader.conf')

// 1. 声明一个webpack变量
const webpack = require("webpack")
function resolve(dir) {
    return path.join(__dirname, '..', dir)
}
module.exports = {
	....
    context: path.resolve(__dirname, '../'),
    node: {
		...
    },
    // 2. 主要就是下面这段
    plugins: [
        new webpack.ProvidePlugin({
            $:"jquery",
            jQuery: "jquery"
        })
    ]
}此时,我的vue/cli已经升级到了5.0.8版本,然后通过vue create命令创建的vue2项目,导致项目根目录下没有build目录,所以在项目根目录下找到vue.config.js文件(没有就手动创建),添加如下内容。
const { defineConfig } = require('@vue/cli-service')

// 定义webpack变量
const webpack = require("webpack")
module.exports = defineConfig({
    transpileDependencies: true,
    // 就是下面的配置搞上就行了
    configureWebpack: {
        plugins: [
            new webpack.ProvidePlugin({
                $: "jquery",
                jQuery: "jquery",
                "windows.jQuery": "jquery",
                "windows.$": "jquery",
                Popper: ["popper.js", "default"]
            })
        ]
    }
})3. 在需要地方直接this.$使用,这里以App.vue为例
<template>
    <div id="app">
        <div>
            <button @click="Click">点我</button>
            <p id="c1">是我</p>
        </div>
    </div>
</template>
<script>
export default {
    name: 'App',
    methods:{
        Click(){
            $("#c1").toggle()
        }
    }
}
</script>
<style>
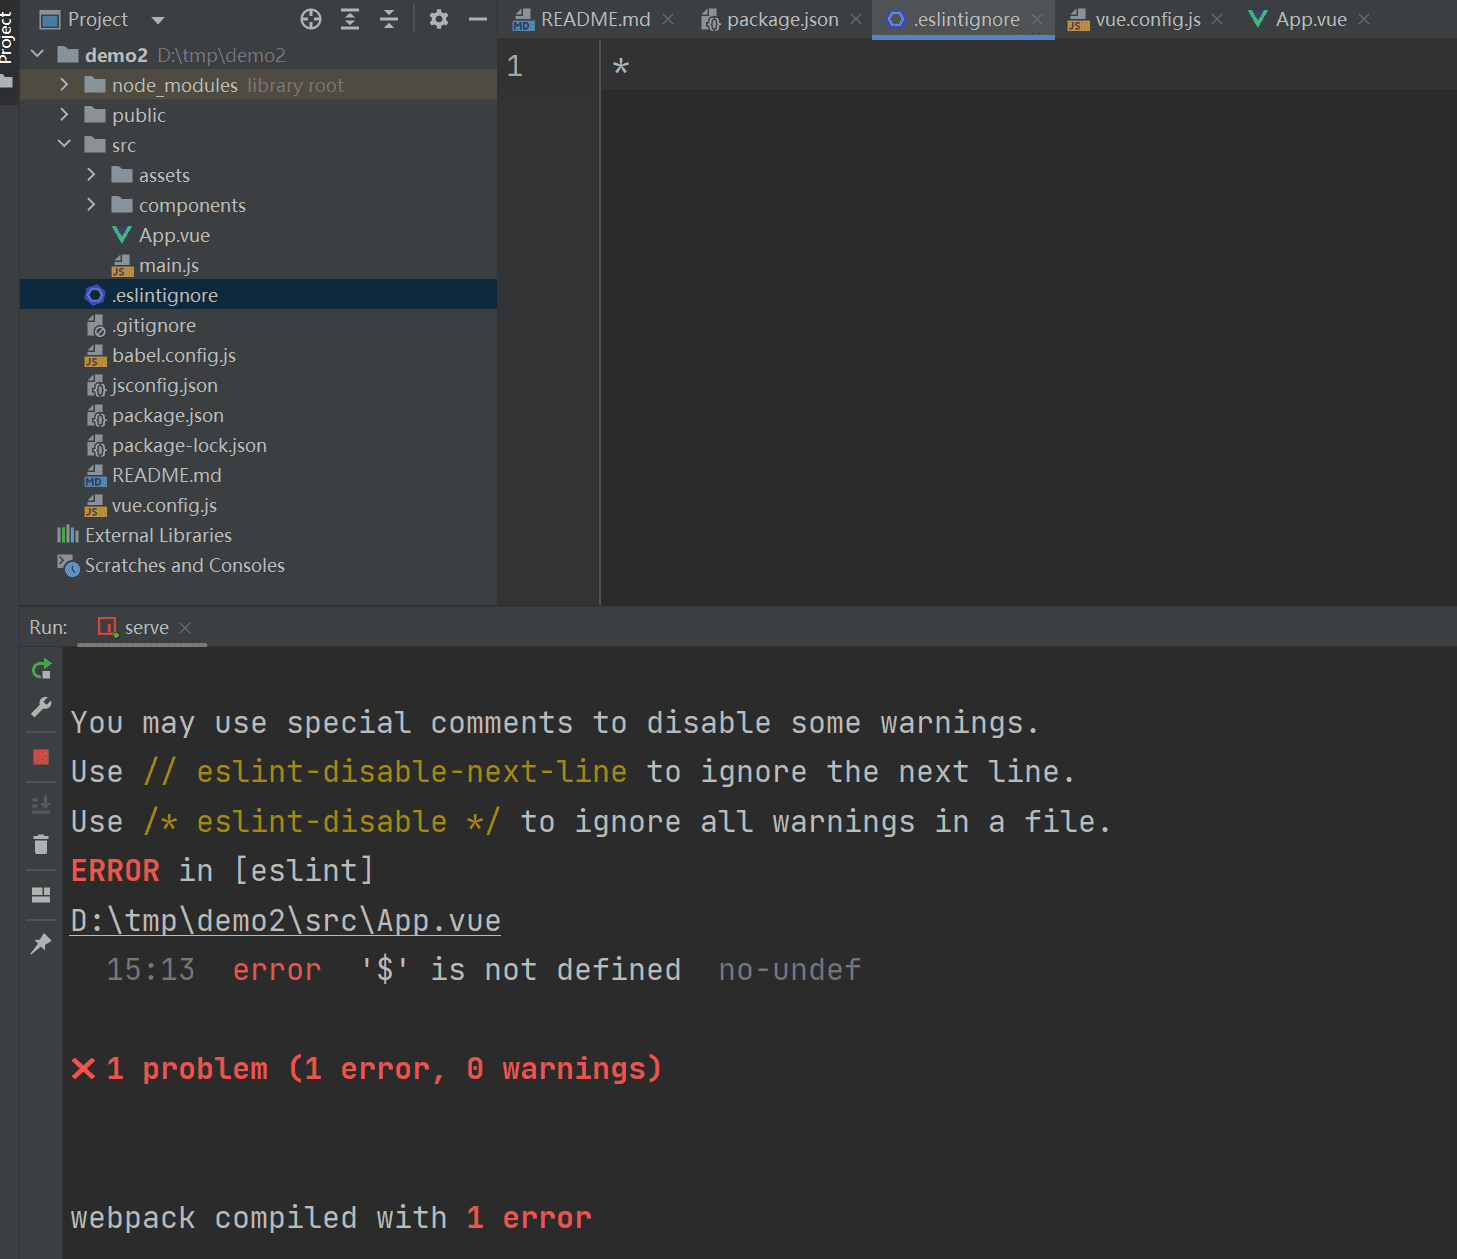
</style>如果运行报如下错误,可以在项目根目录下新建一个.eslintignore文件

文件内容就写个*就完了:
*然后重新运行项目。
基于vue/cli:vue3引入jQuery
环境是: vue/cli5.0.8,我用vue create命令创建的vue3项目
1. 下载jQuery
npm install jquery --save2. 在项目根目录下找到vue.config.js文件(没有就手动创建)添加如下内容
const { defineConfig } = require('@vue/cli-service')
// 定义webpack变量
const webpack = require("webpack")
module.exports = defineConfig({
  transpileDependencies: true,
  // 就是下面的配置搞上就行了
  configureWebpack: {
    plugins: [
      new webpack.ProvidePlugin({
        $: "jquery",
        jQuery: "jquery",
        "windows.jQuery": "jquery",
        "windows.$": "jquery",
        Popper: ["popper.js", "default"]
      })
    ]
  }
})3. 在需要地方直接this.$使用,这里以App.vue为例
<template>
    <div id="app">
        <div>
            <button @click="Click">点我</button>
            <p id="c1">是我</p>
        </div>
    </div>
</template>
<script>
export default {
    name: 'App',
    methods:{
        Click(){
            $("#c1").toggle()
        }
    }
}
</script>
<style>
</style>这个引入就跟上面的vue2全局引入一样了。
如果运行报如下错误,可以在项目根目录下新建一个.eslintignore文件

文件内容就写个*就完了:
*然后重新运行项目就应该没问题了。
基于vite:vue2和vue3全局引入jQuery
好吧,vite中,vue2和vue3全局引入jQuery的方式是一样的。
1. 下载jQuery
npm i jquery @rollup/plugin-inject -S2. 在项目根目录下找到vite.config.js文件(没有就手动创建)添加如下内容
注意是vite.config.js不是vue.config.js,千万别搞混了。
import {fileURLToPath, URL} from 'node:url'

import {defineConfig} from 'vite'
import legacy from '@vitejs/plugin-legacy'
import vue2 from '@vitejs/plugin-vue2'

// 1. 先引入插件
import inject from '@rollup/plugin-inject'
export default defineConfig({
    plugins: [
        vue2(),
        legacy({
            targets: ['ie >= 11'],
            additionalLegacyPolyfills: ['regenerator-runtime/runtime']
        }),
        // 2. 就下面inject的配置
        inject({
            $: "jquery",  // 这里会自动载入 node_modules 中的 jquery
            jQuery: "jquery",
            "windows.jQuery": "jquery"
        })
    ],
    resolve: {
        alias: {
            '@': fileURLToPath(new URL('./src', import.meta.url))
        }
    }
})3. 在需要地方直接this.$使用,这里以App.vue为例
<template>
    <div id="app">
        <div>
            <button @click="Click">点我</button>
            <p id="c1">是我</p>
        </div>
    </div>
</template>
<script>
export default {
    name: 'App',
    methods:{
        Click(){
            $("#c1").toggle()
        }
    }
}
</script>
<style>
</style>vue2和vue3引入bootstrap3
无论是基于vue/cli还是vite创建的vue2或者vue3,引入bootstrap3的方式都一样。
前提:必须在全局引入好jQuery
无论是基于vue/cli还是vite的方式,bootstrap的引入方式都一样。
1. 下载bootstrap3
npm install bootstrap32. 在min.js中引入bootstrap
import Vue from 'vue'
import App from './App'

// 就下面这两行,结尾带不带3,这个可以从node_modules中可以找到bootstrap3的包目录
// 而下面的bootstrap3就对应着node_modules中bootstrap3的包名
import 'bootstrap3'
import 'bootstrap3/dist/css/bootstrap.min.css'
import "bootstrap3/dist/js/bootstrap.min.js";

Vue.config.productionTip = false
new Vue({
  el: '#app',
  components: { App },
  template: '<App/>'
})3. 然后在组件中就可以使用了,这里以App.vue为例
<template>
    <div id="app">
        <div>
            <button @click="Click" class="btn btn-danger">点我</button>
            <p id="c1">是我</p>
        </div>
        <div>
            <table class="table">
                <caption>Optional table caption.</caption>
                <thead>
                <tr>
                    <th>#</th>
                    <th>First Name</th>
                    <th>Last Name</th>
                    <th>Username</th>
                </tr>
                </thead>
                <tbody>
                <tr>
                    <th scope="row">1</th>
                    <td>Mark</td>
                    <td>Otto</td>
                    <td>@mdo</td>
                </tr>
                <tr>
                    <th scope="row">2</th>
                    <td>Jacob</td>
                    <td>Thornton</td>
                    <td>@fat</td>
                </tr>
                <tr>
                    <th scope="row">3</th>
                    <td>Larry</td>
                    <td>the Bird</td>
                    <td>@twitter</td>
                </tr>
                </tbody>
            </table>
        </div>
    </div>
</template>
<script>
export default {
    name: 'App',
    methods:{
        Click(){
            // 通过$来调用jQuery
            $("#c1").toggle()
            console.log($)

        }
    }
}
</script>
<style>
</style>