 王张开
王张开about
腾讯云centos7.6+uwsgi+django3.2+mysql5.7+supervisor+nginx+python3.6+virtualenv
部署项目是一个复杂且麻烦的过程:
- 平台不同,ubuntu、Windows iis、centos7。
- 项目不同,它依赖的三方软件也不同,要求也不同。
- 大家的水平也不同,小白的话,有点难。
- 对于云服务器也不太了解,设置安全组/防火墙。
- 对于MySQL软件的用户、权限设置不清楚。
- 对于Linux、云服务器、nginx,都要有了解。
- 对于查看各种日志不了解。
- 项目本身在本地都跑不通的这些bug,没有解决完,就上线。
- 项目开发中,在某些具体功能中把代码写死的,比如连接
127.0.0.1的本地开发环境的配置。
务必要记住
- 本地开发环境,在把项目代码上传到云服务器之前;要在本地进行足够的测试;而且,要把所有连接本地的一些配置,都要改为线上环境的;在项目中,写死的路径、连接,一定要统一的放到配置文件中。
- 尽量避免出现中文路径和中文文件名。包括一些特殊字符。
部署前的准备
关闭防火墙
关闭防火墙:
systemctl stop firewalld.service
# 禁止开机启动防火墙
systemctl disable firewalld.service实际部署时,通过nginx反向代理
# 查看防火墙状态
systemctl status firewalld.service
# 关闭selinux
sed -i.ori 's#SELINUX=enforcing#SELINUX=disabled#g' /etc/selinux/config同时,如果你是云服务的话,还要确保安全组的安全规则这里,放开将来的端口,否则外部访问不了。

Python解释器
参考:https://www.cnblogs.com/Neeo/articles/12829625.html#编译安装
virtualenv
参考:https://www.cnblogs.com/Neeo/articles/12327035.html#virtualenv-1
MySQL
参考:https://www.cnblogs.com/Neeo/articles/13047344.html#单实例配置
我的MySQL配置:
[mysqld]
user=mysql
basedir=/opt/software/mysql
datadir=/data/mysql
server_id=6
port=3306
socket=/tmp/mysql.sock

character-set-server=utf8mb4
collation-server=utf8mb4_unicode_ci
init_connect='SET NAMES utf8mb4'
skip-character-set-client-handshake=true

[client]
default-character-set=utf8mb4

[mysql]
socket=/tmp/mysql.sock
default-character-set=utf8mb4
prompt=3306 [\\d]>nginx
参考:https://www.cnblogs.com/Neeo/articles/11380731.html
supervisor
参考:https://www.cnblogs.com/Neeo/p/8651136.html
部署流程
首先说下我们会用到的相关的软件和相关的配置目录:
# 项目相关
/opt/crm      						# crm项目部署相关的东西,都放到这里,方便后续版本迭代
/opt/crm/crmenv						# crm项目专用虚拟环境
/opt/crm/crmenv/bin/activate
/opt/crm/uwsgi.ini                  # uwsgi配置文件位置
/opt/crm/crmstatic/					# 静态文件收集到这个目录里面来
/opt/crm/newcrm						# crm项目根目录
/opt/crm/newcrm/newcrm.sql			# crm项目初始的sql文件
/opt/crm/newcrm/requirements.txt	# crm项目依赖模块所在文件
/opt/crm/newcrm/newcrm/settings.py  # crm项目的配置文件

# nginx相关
/opt/tngx233/						# nginx安装目录
/opt/tngx233/conf/nginx.conf		# nginx配置文件

# supervior相关
/etc/supervisord.conf				# supervisor配置文件

# MySQL
/etc/my.cnf # mysql配置文件各个软件安装成功,并且配置完毕,都是可用的!!!
还要注意,就是后看我笔记时,注意所在目录,根据所在目录不同,可能操作的文件路径写法也不同,这点需要注意。
1. 将源码上传到服务器指定目录
我这里的crm项目的项目名叫做newcrm。
所有的部署项目有关的基础目录是:
[root@cs ~]# mkdir /opt/crm
[root@cs ~]# cd /opt/crm/
[root@cs crm]# ls
newcrm.zip
[root@cs crm]# unzip newcrm.zip
[root@cs crm]# rm -rf newcrm.zip
[root@cs crm]# ls
newcrm现在,/opt/crm/newcrm就是我的crm项目了。
如果没有unzip,就:
yum install -y unzip接下来,要检查crm项目的settings文件,确保ALLOWED_HOSTS参数和数据库都是可用的。
2. 修改settings配置
修改项目的settings:
# 允许所有的请求访问我
ALLOWED_HOSTS = ["*"]

# 配置上可用的MySQL数据库,前提是这个数据库是存在的,且字符编码是utf-8
DATABASES = {
    'default': {
        'ENGINE': 'django.db.backends.mysql',
        'HOST': '127.0.0.1',    #主机
        'PORT': 3306,           #端口
        'USER':'root',
        'PASSWORD':'123',
        'NAME': 'newcrm',     #数据库名
    }
}

# 用户nginx接收所有的静态文件,都收集到如下的目录中去
STATIC_ROOT = '/opt/crm/crmstatic/'3. 创建虚拟环境
在/opt/crm/中创建虚拟环境:
[root@cs crm]# pwd
/opt/crm
[root@cs crm]# virtualenv --python=python3 crmenv
created virtual environment CPython3.6.8.final.0-64 in 2075ms
  creator CPython3Posix(dest=/opt/crm/crmenv, clear=False, no_vcs_ignore=False, global=False)
  seeder FromAppData(download=False, pip=bundle, setuptools=bundle, wheel=bundle, via=copy, app_data_dir=/root/.local/share/virtualenv)
    added seed packages: pip==21.3.1, setuptools==59.6.0, wheel==0.37.1
  activators BashActivator,CShellActivator,FishActivator,NushellActivator,PowerShellActivator,PythonActivator
[root@cs crm]# source crmenv/bin/activate
(crmenv) [root@cs crm]# python -V
Python 3.6.8
(crmenv) [root@cs crm]# pip -V
pip 21.3.1 from /opt/crm/crmenv/lib/python3.6/site-packages/pip (python 3.6)
(crmenv) [root@cs crm]# pip freeze   # 现在什么模块都没有
(crmenv) [root@cs crm]# pip install -r ./newcrm/requirements.txt这个新的虚拟环境,就是将来要用它来跑我们的项目。
并且,已经使用pip将requirements.txt中的模块下载到本地了。
我的requirements.txt长这样:
asgiref==3.4.1
Django==3.2
PyMySQL==1.0.2
pytz==2022.1
sqlparse==0.4.2
typing_extensions==4.1.1
uWSGI==2.0.204. 数据库迁移
首先要确保MySQL中创建了newcrm数据库。
create database newcrm charset=utf8mb4;然后,在虚拟环境开启的状态下,进入newcrm项目目录,执行数据库迁移命令:
(crmenv) [root@cs crm]# cd newcrm/
(crmenv) [root@cs newcrm]# python manage.py makemigrations
(crmenv) [root@cs newcrm]# python manage.py migrate如果在数据库迁移过程中,提示缺少什么模块,直接使用pip下载即可。
由于我的项目目录中有一个sql文件,可以导入到MySQL中,作为初始数据,方便后续运行项目后直接测试,所以,我们把它导入吧:
(crmenv) [root@cs newcrm]# mysql -uroot -p123 <newcrm.sql
mysql: [Warning] Using a password on the command line interface can be insecure.不用管这个warning,现在初始数据导入成功了。
5. 测试项目能否正常运行
到目前为止项目数据迁移成功,初始数据录入成功,就可以简单的跑一下测测了:
(crmenv) [root@cs newcrm]# python manage.py runserver 0.0.0.0:8888
Watching for file changes with StatReloader
Performing system checks...

System check identified some issues:

WARNINGS:
work.MyUserInfo.roles: (fields.W340) null has no effect on ManyToManyField.

System check identified 1 issue (0 silenced).
May 01, 2022 - 08:20:41
Django version 3.2, using settings 'newcrm.settings'
Starting development server at http://0.0.0.0:8888/
Quit the server with CONTROL-C.通过远程服务器地址加端口也能直接访问,这里直接返回了登录页面。一切ok。

完事就可以CONTROL + C,结束测试,往下进行了。
6. 配置uwsgi
但通常我们使用uwsgi作为django的web服务器,所以要继续进行配置uwsgi。
首先先下载:
(crmenv) [root@cs newcrm]# pip install uwsgi当然了,这个uwsgi应该在requirements.txt中,应该已经下完了。
然后在/opt/crm/目录中,新建一个uwsgi.ini这样的一个ini配置文件:
(crmenv) [root@cs newcrm]# cd ..
(crmenv) [root@cs crm]# pwd
/opt/crm
(crmenv) [root@cs crm]# touch uwsgi.ini
(crmenv) [root@cs crm]# vim uwsgi.iniini配置文件长这样:
在项目根目录下,新建一个uwsgi.ini这样的一个ini配置文件:
[uwsgi]

# 填写crm项目的根目录
chdir=/opt/crm/newcrm/

# 填写与项目同名的目录,这是个相对路径,主要就是找到其内的wsgi.py这个文件
module=newcrm.wsgi

# 虚拟环境的根目录,也就是工作目录
home=/opt/crm/crmenv

# uwsgi的主进程,其他的uwsgi的进程都是这个主进程的子进程,当你kill时,杀掉的也是这个master主进程
master=true

# uwsgi并发时的工作进程的数量,官网的建议是:2 * cup核数 + 1
# 由这几个进程来分摊并发请求
processes=3

# 临时使用http,实际部署时,通过nginx反向代理,就要把http换成socket,这点别忘了改
# http=0.0.0.0:8888
socket=0.0.0.0:8888

# 当服务器退出时,自动删除unix socket文件和pid文件
vacuum=true

# 默认的请求的大小为4096,如果你接收到了一个更大的请求 (例如,带有大cookies或者查询字符串),那么超过4096的限制就会报错invalid request block size: 4547 (max 4096)...skip,所以我们这里提前调整下
# https://uwsgi-docs-zh.readthedocs.io/zh_CN/latest/Options.html#buffer-size
buffer-size=32768

# uwsgi的日志文件
logto=/opt/crm/logs/uwsgi.loguwsgi的相关参数:
# 相对路径启动,指定配置文件启动后端
uwsgi --ini ./uwsgi.ini    # 启动
    # 启动时会生成两个文件,分别为:
    # PID文件 标识这个程序所处的状态
    # SOCK文件  用来和其他程序通信的
uwsgi --stop uwsgi.pid    # 停止
uwsgi --reload uwsgi.ini   # 重置


# 绝对路径启动,就是要找到uwsgi的绝对路径和uwsig.ini的绝对路径
(crmenv) [root@cs crm]# which uwsgi
/opt/crm/crmenv/bin/uwsgi
# uwsig.ini的绝对路径是 /opt/crm/uwsgi.ini

# 所以,绝对路径启动就是下面的样子
/opt/crm/crmenv/bin/uwsgi --ini /opt/crm/uwsgi.ini

# 关闭uwsgi进程,一键杀死所有与uwsgi相关的进程
pkill -9 uwsgi

# 你也可以先过滤出来,在根据pid进行kill
ps -ef |grep uwsgi # 查看进程,找到pid
kill -9 170515 # 杀死对应进程,-9强制 170515=pid当然了,现在我们不需要使用上面的命令启动,我们由于用的是socket=0.0.0.0:8888参数,而不是http=0.0.0.0:8888参数,所以,还要借助nginx才能行。
这里我们默认此时的配置都是无误的。
7. nginx配置
我们修改nginx的配置文件,并平滑重启:
(crmenv) [root@cs crm]# vim /opt/tngx233/conf/nginx.conf
(crmenv) [root@cs crm]# cat /opt/tngx233/conf/nginx.conf
user root;
worker_processes 1;
events {
worker_connections 1024;
}
pid logs/nginx.pid;
error_log logs/error.log;
http {
include mime.types;
default_type application/octet-stream;
server {
# 由于我多个项目都部署到了这个测试服务器,我这里关于crm项目的nginx,监听8000端口
listen 8000;
server_name localhost;
charset utf-8;
error_page 404 /40x.html;
# 当访问8000端口时,就转发给8888这个uwsgi监听的端口
location / {
include uwsgi_params;
uwsgi_pass 0.0.0.0:8888;
}
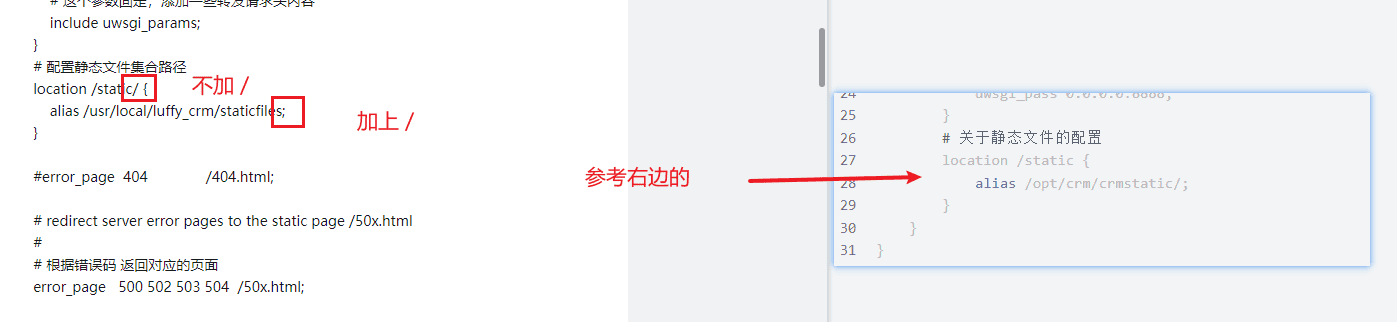
# 关于静态文件的配置
# 注意,location /static 后面不要带/,即,不要写成这样:location /static/
location /static {
# 注意,别名路径最后要带上/
alias /opt/crm/crmstatic/;
}
}
}
(crmenv) [root@cs crm]# nginx -t
nginx: the configuration file /opt/tngx233//conf/nginx.conf syntax is ok
nginx: configuration file /opt/tngx233//conf/nginx.conf test is successful
(crmenv) [root@cs crm]# nginx -s reload补充,nginx配置中,关于静态文件的配置这块location后面的static必须和django settings中的STATIC_URL保持一致,否则静态文件加载失败。
# nginx的配置
location /static {
            alias /opt/crm/crmstatic/;
}

# django settings配置
STATIC_URL = '/static/'收集静态文件
(crmenv) [root@cs crm]# cd newcrm/
(crmenv) [root@cs newcrm]# python manage.py collectstatic

186 static files copied to '/opt/crm/crmstatic'.supervisor管理uwsgi进程
编辑supervisord.conf配置文件,追加如下内容:
[program:newcrm]
command=/opt/crm/crmenv/bin/uwsgi --ini /opt/crm/uwsgi.ini
autostart=true       ; 在supervisord启动的时候也自动启动
startsecs=10         ; 启动10秒后没有异常退出,就表示进程正常启动了,默认为1秒
autorestart=true     ; 程序退出后自动重启,可选值:[unexpected,true,false],默认为unexpected,表示进程意外杀死后才重启
stopasgroup=true     ;默认为false,进程被杀死时,是否向这个进程组发送stop信号,包括子进程
killasgroup=true ;默认为false,向进程组发送kill信号,包括子进程然后就可以尝试通过supervisor命令启动uwsgi,注意,要先杀掉之前启动uwsgi相关进程:
(crmenv) [root@cs crm]# pkill -9 uwsgi
(crmenv) [root@cs crm]# pkill -9 supervisord
(crmenv) [root@cs crm]# supervisord -c /etc/supervisord.conf
(crmenv) [root@cs crm]# supervisorctl -c /etc/supervisord.conf
newcrm                           STARTING
supervisor> status newcrm
newcrm                           RUNNING   pid 24556, uptime 0:00:11
supervisor> exit;
(crmenv) [root@cs crm]# ps -ef|grep uwsgi
root     24556 24555  1 17:53 ?        00:00:00 /opt/crm/crmenv/bin/uwsgi --ini /opt/crm/uwsgi.ini
root     24558 24556  0 17:53 ?        00:00:00 /opt/crm/crmenv/bin/uwsgi --ini /opt/crm/uwsgi.ini
root     24559 24556  0 17:53 ?        00:00:00 /opt/crm/crmenv/bin/uwsgi --ini /opt/crm/uwsgi.ini
root     24560 24556  0 17:53 ?        00:00:00 /opt/crm/crmenv/bin/uwsgi --ini /opt/crm/uwsgi.ini
root 24563 23947 0 17:53 pts/0 00:00:00 grep --color=auto uwsgi现在,前端访问8000端口就可以看看效果了。

可以使用如下账号密码进行登录:
用户名:
	kaifeng
密码:
123部署中的错误
Error: That port is already in use
这个报错,可能就是你运行django的端口被占用了,解决办法就是过滤出来这个端口,杀掉他,或者换个端口运行。
这里来看怎么过滤出来这个端口,进而杀掉进程:
[root@cs ~]# netstat -tunlp|grep 8888
tcp        0      0 0.0.0.0:8888            0.0.0.0:*               LISTEN      13793/uwsgi
[root@cs ~]# pkill -9 uwsgi
[root@cs ~]# netstat -tunlp|grep 8888看到这个端口被之前的uwsgi在占用,你可以把uwsgi相关进程杀掉。
如果你的uwsgi是supervisor启动的,那么你要先关掉supervisor,再关掉uwsgi:
pkill -9 supervisor
pkill -9 uwsgips:
- kill是根据pid杀死进程。
- pkill是根据进程名杀死进程。
DisallowedHost as /
报错长这样:
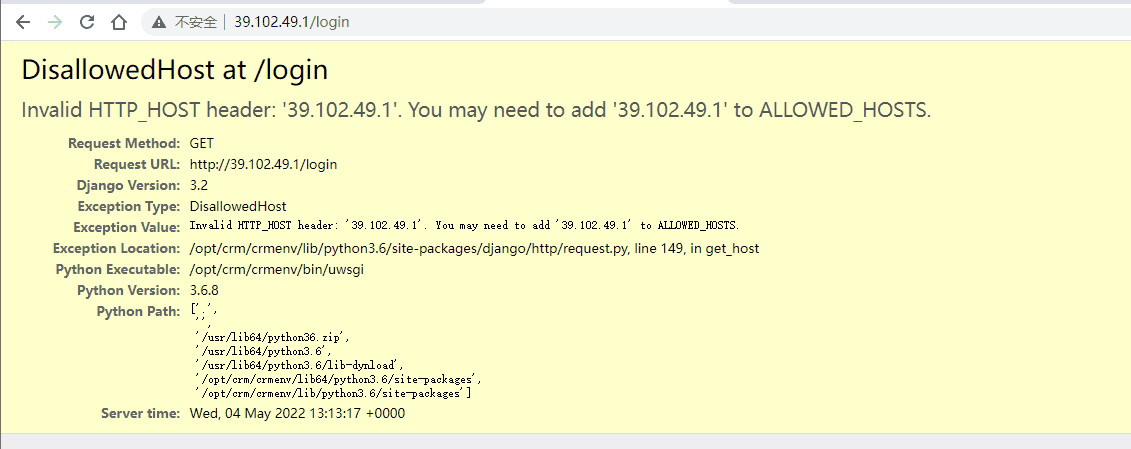
这个报基本上就是你的django settings中的ALLOW_HOSTS列表配置的有问题:
ALLOWED_HOSTS = [] # 你可能写成了空列表直接修改成下面这样的:
ALLOWED_HOSTS = ["*"]然后重启uwsgi的进程,注意,如果你是supervisor管理的uwsgi,那么可以直接通过supervisor进行重启:
(crmenv) [root@cs newcrm]# vim newcrm/settings.py
(crmenv) [root@cs newcrm]# supervisorctl -c /etc/supervisord.conf
newcrm                           RUNNING   pid 26464, uptime 2 days, 6:19:26
supervisor> restart newcrm
newcrm: stopped
newcrm: started
supervisor>supervisor启动uwsgi失败
检查supervisord.conf文件是否配置的有问题。
也要检查uwsgi.ini文件的配置,其中uwsgi.ini中的daemonize参数和supervisor有冲突,不能打开:
# daemonize = /var/log/uwsgi.log即删除"uwsgi.ini"文件中的"daemonize"项即可。
静态文件加载成功,但页面中不生效
这个问题困扰了我很久,具体效果就是js、css都收集成功,前端也能正常的加载,但页面渲染时就是没有效果!!
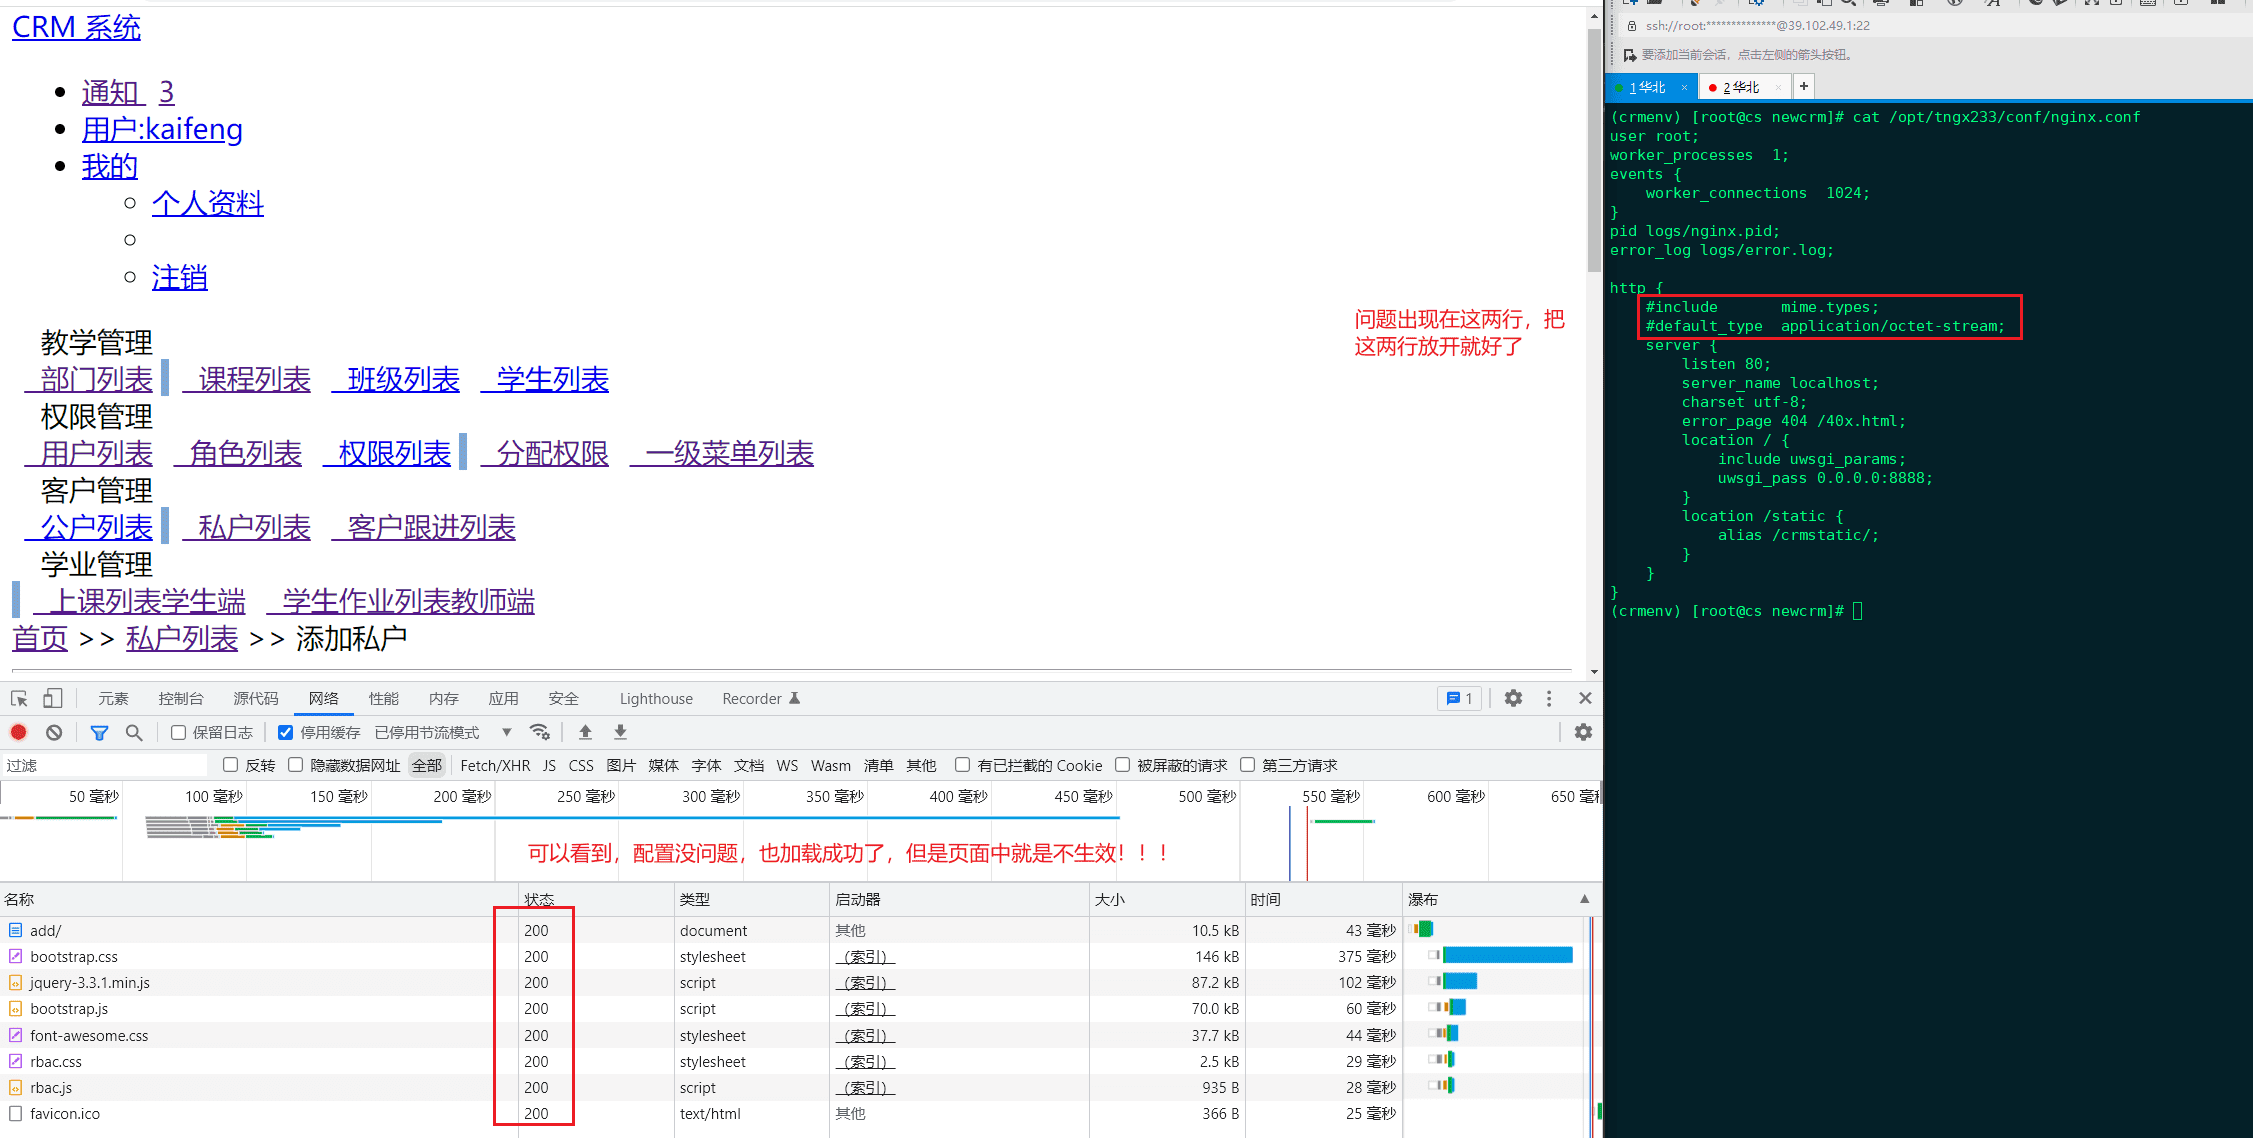
搞得我一直去检查我的静态文件收集相关的配置,没注意到这两个参数:
http {
    # 主要是声明include参数
	include mime.types;
	# 这个参数注释掉也不影响,但也给它放开吧
	default_type  application/octet-stream;
}参考:https://www.365seal.com/y/75pAow1avo.html
静态文件加载不上
这是另一个静态文件加载不上的案例和解决办法。 就是nginx配置的问题:
静态文件配置无误,浏览器访问nginx,静态文件加载报403 forbidden
python3.10 + nginx + uwsgi + django3.2 + mysql5.7 + centos7
报错环境:uwsgi配置、nginx静态文件代理都正常,前端页面访问,静态文件包403 forbidden。
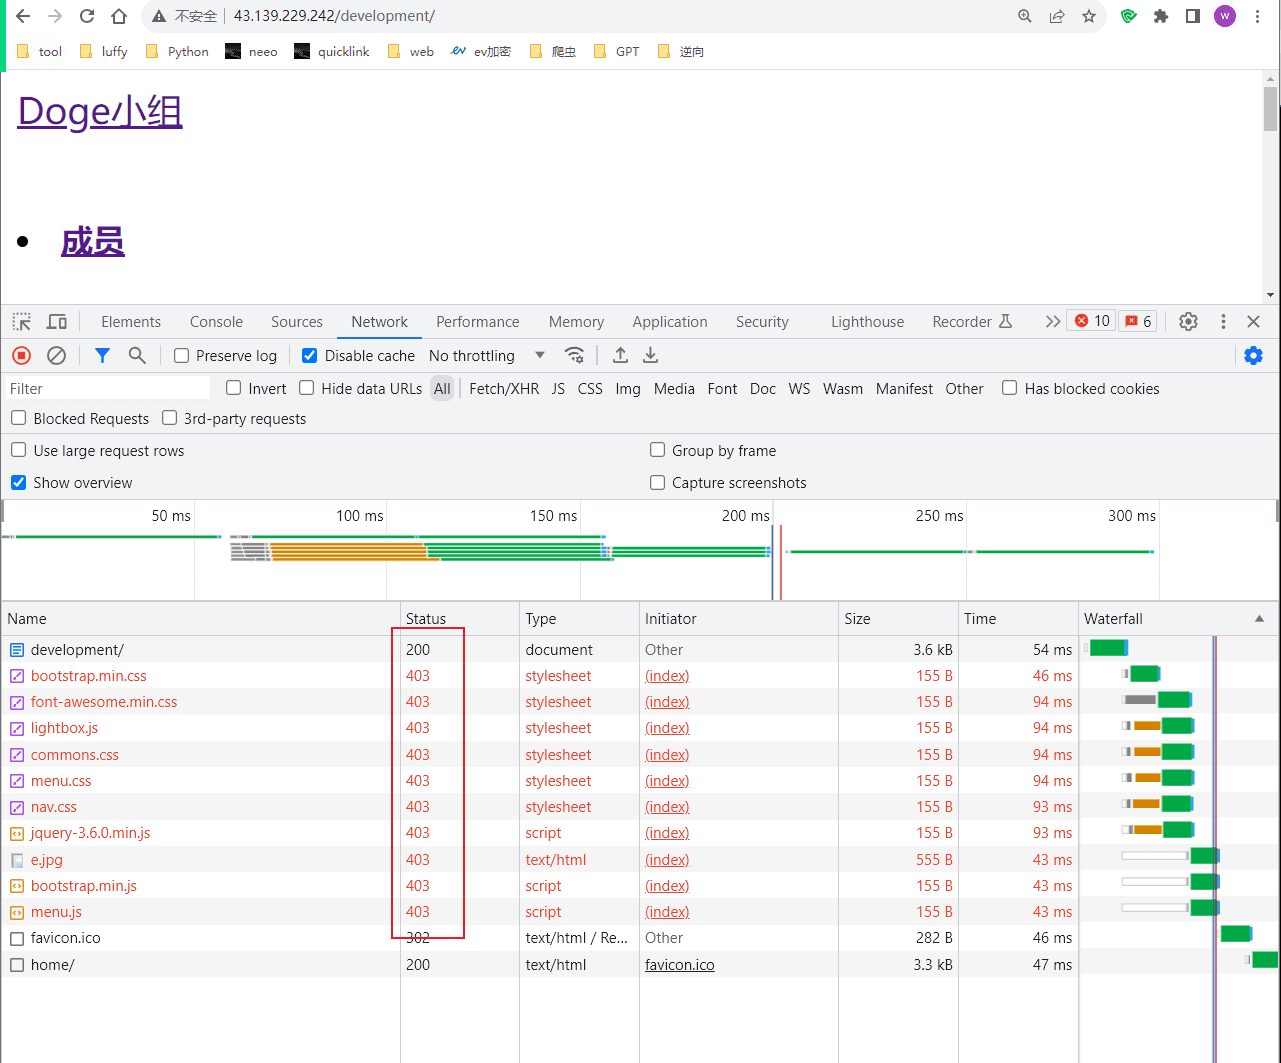
原因,可能是由于启动用户和nginx工作用户不一致所致。 来看nginx工作进程启动的用户是谁:
[root@VM-0-12-centos day03]# ps aux|grep nginx
root     18318  0.0  0.1  39440  2056 ?        Ss   Aug31   0:00 nginx: master process /usr/sbin/nginx
root     21927  0.0  0.1  41964  2524 ?        S    11:47   0:00 nginx: worker process
root     21928  0.0  0.1  41964  2532 ?        S    11:47   0:00 nginx: worker process
root 23845 0.0 0.0 112812 968 pts/5 S+ 11:47 0:00 grep --color=auto nginx可以看到是nginx进程是以root账号启动的。 来看NGINX的配置文件中,NGINX的工作用户是谁:
[root@VM-0-12-centos day03]# head -n 5 /etc/nginx/nginx.conf
user nginx;
worker_processes auto;
error_log /var/log/nginx/error.log;
pid /run/nginx.pid;可以看到user nginx;是NGINX用户,所以和工作进程的root用户不一致导致的。 具体的解决办法就是修改NGINX的配置文件的工作用户:
[root@VM-0-12-centos day03]# vim /etc/nginx/nginx.conf
# 就是修改第一行内容如下
user root;

# 完事之后,平滑重启NGINX
[root@VM-0-12-centos day03]# nginx -s reload前端访问就好了:
参考:https://blog.csdn.net/m0_67403188/article/details/126113702
NGINX + uwsgi配置之后,登录过程中找不到session
NGINX + uwsgi + Django3.2
无论是在本地还是在云服务器上,通过python manage.py runserver运行测试项目,session都没有问题。但只要结合上uwsgi就,从session中就拿不到数据了。 经过排查,发现是settings中的关于session的配置是有问题:
# session配置
SESSION_ENGINE = 'django.contrib.sessions.backends.cache'
SESSION_CACHE_ALIAS = 'default'
SESSION_COOKIE_AGE = 60 * 60 * 24 * 7这么配置任谁看了也说不出毛病,将session缓存到内存中,过期时间7天! 但问题肯定是有的,如果不是结合Redis作为缓存,那么这里指定cache则用的是内存缓存,本地开发没问题,因为本地开发单进程,独享内存资源,也能访问到内存中的session缓存。但通过uwsgi部署就不行了,多进程中,就找不到这个session缓存了,我亲测发现的问题。所以,如果想要使用cache作为session的内存缓存,则搭配Redis使用,否则,就老老实实的用那个db缓存就好了,uwsgi中使用也正常。 最终你可以有两种方案,如果有Redis的话,settings中这么配置:
CACHES = {
    "default": {
        "BACKEND": "django_redis.cache.RedisCache",
        "LOCATION": "redis://:@127.0.0.1:6379/2",
        "OPTIONS": {
            "CLIENT_CLASS": "django_redis.client.DefaultClient",
            "PASSWORD": "123456",
            "CONNECTION_POOL_KWARGS": {
                "max_connections": 100,
            },
        }
    },
    # 提供存储短信验证码
    "sms_code": {
        "BACKEND": "django_redis.cache.RedisCache",
        "LOCATION": "redis://:@127.0.0.1:6379/2",
        "OPTIONS": {
            "CLIENT_CLASS": "django_redis.client.DefaultClient",
            "PASSWORD": "123456",
        }
    }
}
# session配置
SESSION_ENGINE = 'django.contrib.sessions.backends.cache'
SESSION_CACHE_ALIAS = 'default'
SESSION_COOKIE_AGE = 60 * 60 * 24 * 7如果你没有Redis,那么你就别用cache了,用db吧,settings中这么配置:
# session配置
SESSION_ENGINE = 'django.contrib.sessions.backends.db'
SESSION_CACHE_ALIAS = 'default'
SESSION_COOKIE_AGE = 60 * 60 * 24 * 7配置https
我这里没有配置,但有个别的项目的关于https的配置,其实配置https配置,uwsgi和Django部分不变,只需要你下载好ssl证书,然后修改NGINX配置就可以了。
user nginx;
worker_processes auto;
error_log /var/log/nginx/error.log;
pid /run/nginx.pid;

# Load dynamic modules. See /usr/share/doc/nginx/README.dynamic.
include /usr/share/nginx/modules/*.conf;

events {
    worker_connections 1024;
}

http {
    log_format  main  '$remote_addr - $remote_user [$time_local] "$request" '
                      '$status $body_bytes_sent "$http_referer" '
                      '"$http_user_agent" "$http_x_forwarded_for"';

    access_log  /var/log/nginx/access.log  main;

    sendfile            on;
    tcp_nopush          on;
    tcp_nodelay         on;
    keepalive_timeout   65;
    types_hash_max_size 4096;

    include             /etc/nginx/mime.types;
    default_type        application/octet-stream;

    # Load modular configuration files from the /etc/nginx/conf.d directory.
    # See http://nginx.org/en/docs/ngx_core_module.html#include
    # for more information.
    # include /etc/nginx/conf.d/*.conf;
    # 关于ssl部分的配置
    server {
        listen       443 ssl;
        server_name  aaa.yiluo.site;

        #证书文件
        ssl_certificate      /data/www/ssl/aaa.yiluo.site_bundle.pem;
        #私钥文件
        ssl_certificate_key  /data/www/ssl/aaa.yiluo.site.key;

        ssl_session_cache    shared:SSL:1m;
        ssl_session_timeout  5m;
        ssl_ciphers ECDHE-RSA-AES128-GCM-SHA256:ECDHE:ECDH:AES:HIGH:!NULL:!aNULL:!MD5:!ADH:!RC4;
        ssl_protocols TLSv1 TLSv1.1 TLSv1.2;
        ssl_prefer_server_ciphers  on;
        # 下面是配置uwsgi的,所有访问以/开头的URL都交给本机的uwsgi来处理
        location / {
            include uwsgi_params;
            uwsgi_pass 127.0.0.1:8001;
        }
        # NGINX静态文件代理
        location /static {
            alias  /data/www/allstatic;
        }
    }
    # 将80端口的http请求都重定向到https
    server {
        listen      80;
        server_name aaa.yiluo.site;
        rewrite ^(.*) https://$server_name$1 redirect;
    }
}