about
软件安装
下载安装
1. 下载
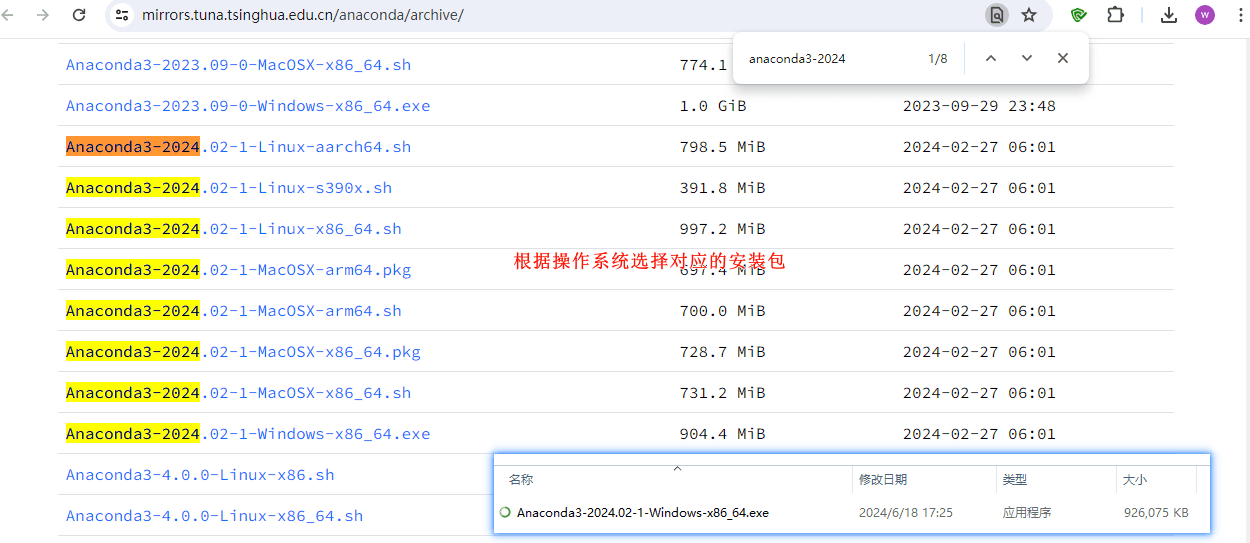
从下面两个地址都可以下载,清华源的镜像下载比较快
- 官网:https://www.anaconda.com/download/success
- 清华源:https://mirrors.tuna.tsinghua.edu.cn/anaconda/archive/
我这里以清华源的为例,我是Windows,所以我选择:

2. 安装

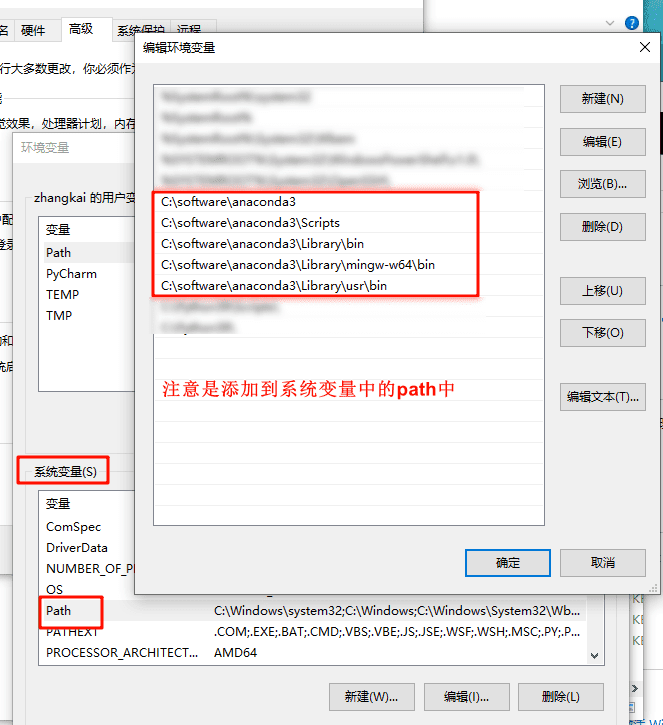
安装过程中,有一步是选择是否勾选添加环境变量的选项,网上有说勾的,也有说不勾的,总之,这里你可以选择勾上,如果将来真出了问题,我们可以手动添加系统变量,都有这些选项:
注意是系统变量,而不是用户变量。我这里anaconda安装在C:\software中:

| 系统变量 | 路径 | 说明 |
|---|---|---|
| Path | C:\software\Anaconda3 | Python需要 |
| Path | C:\software\Anaconda3\Scripts | conda自带脚本 |
| Path | C:\software\Anaconda3\Library\bin | jupyter notebook动态库 |
| Path | C:\software\Anaconda3\Library\mingw-w64\bin | 使用C with python的时候 |
| Path | C:\software\Anaconda3\Library\usr\bin | 没有该目录就算了 |
由于版本不一致,可能有些目录不存在,没有就算了。
测试是否安装成功
打开终端:
C:\Users\zhangkai>python -V
Python 3.11.7

C:\Users\zhangkai>conda --version
conda 24.1.2

C:\Users\zhangkai>conda info

     active environment : None
       user config file : C:\Users\zhangkai\.condarc   # 留意这个文件,后续会用到
 populated config files :
          conda version : 24.1.2
    conda-build version : 24.1.2
         python version : 3.11.7.final.0
                 solver : libmamba (default)
       virtual packages : __archspec=1=x86_64
                          __conda=24.1.2=0
                          __win=0=0
       base environment : C:\software\anaconda3  (read only)
      conda av data dir : C:\software\anaconda3\etc\conda
  conda av metadata url : None
           channel URLs : https://repo.anaconda.com/pkgs/main/win-64
                          https://repo.anaconda.com/pkgs/main/noarch
                          https://repo.anaconda.com/pkgs/r/win-64
                          https://repo.anaconda.com/pkgs/r/noarch
                          https://repo.anaconda.com/pkgs/msys2/win-64
                          https://repo.anaconda.com/pkgs/msys2/noarch
          package cache : C:\software\anaconda3\pkgs
                          C:\Users\zhangkai\.conda\pkgs
                          C:\Users\zhangkai\AppData\Local\conda\conda\pkgs
       envs directories : C:\Users\zhangkai\.conda\envs
                          C:\software\anaconda3\envs
                          C:\Users\zhangkai\AppData\Local\conda\conda\envs
               platform : win-64
             user-agent : conda/24.1.2 requests/2.31.0 CPython/3.11.7 Windows/10 Windows/10.0.17763 solver/libmamba conda-libmamba-solver/24.1.0 libmambapy/1.5.6 aau/0.4.3 c/z81BnRTX9HUhoGc9QbkLig s/_37yMDB6xVYggbno6Z_5Sw
          administrator : False
             netrc file : None
           offline mode : False

C:\Users\zhangkai>jupyter notebook
[I 2024-06-18 18:03:03.146 ServerApp] Package notebook took 0.0000s to import
[I 2024-06-18 18:03:03.162 ServerApp] Package jupyter_lsp took 0.0155s to import
[W 2024-06-18 18:03:03.162 ServerApp] A `_jupyter_server_extension_points` function was not found in jupyter_lsp. Instead, a `_jupyter_server_extension_paths` function was found and will be used for now. This function name will be deprecated in future releases of Jupyter Server.
[I 2024-06-18 18:03:03.177 ServerApp] Package jupyter_server_terminals took 0.0088s to import
[I 2024-06-18 18:03:03.177 ServerApp] Package jupyterlab took 0.0000s to import
[I 2024-06-18 18:03:03.224 ServerApp] Package notebook_shim took 0.0000s to import
[W 2024-06-18 18:03:03.224 ServerApp] A `_jupyter_server_extension_points` function was not found in notebook_shim. Instead, a `_jupyter_server_extension_paths` function was found and will be used for now. This function name will be deprecated in future releases of Jupyter Server.
[I 2024-06-18 18:03:03.771 ServerApp] Package panel.io.jupyter_server_extension took 0.5491s to import
[I 2024-06-18 18:03:03.771 ServerApp] jupyter_lsp | extension was successfully linked.
[I 2024-06-18 18:03:03.786 ServerApp] jupyter_server_terminals | extension was successfully linked.
[I 2024-06-18 18:03:03.786 ServerApp] jupyterlab | extension was successfully linked.
[I 2024-06-18 18:03:03.786 ServerApp] notebook | extension was successfully linked.
[I 2024-06-18 18:03:04.037 ServerApp] notebook_shim | extension was successfully linked.
[I 2024-06-18 18:03:04.037 ServerApp] panel.io.jupyter_server_extension | extension was successfully linked.
[I 2024-06-18 18:03:04.052 ServerApp] notebook_shim | extension was successfully loaded.
[I 2024-06-18 18:03:04.068 ServerApp] jupyter_lsp | extension was successfully loaded.
[I 2024-06-18 18:03:04.068 ServerApp] jupyter_server_terminals | extension was successfully loaded.
[I 2024-06-18 18:03:04.068 LabApp] JupyterLab extension loaded from C:\software\anaconda3\Lib\site-packages\jupyterlab
[I 2024-06-18 18:03:04.068 LabApp] JupyterLab application directory is C:\software\anaconda3\share\jupyter\lab
[I 2024-06-18 18:03:04.068 LabApp] Extension Manager is 'pypi'.
[I 2024-06-18 18:03:04.068 ServerApp] jupyterlab | extension was successfully loaded.
[I 2024-06-18 18:03:04.068 ServerApp] notebook | extension was successfully loaded.
[I 2024-06-18 18:03:04.068 ServerApp] panel.io.jupyter_server_extension | extension was successfully loaded.
[I 2024-06-18 18:03:04.068 ServerApp] Serving notebooks from local directory: C:\Users\zhangkai
[I 2024-06-18 18:03:04.068 ServerApp] Jupyter Server 2.10.0 is running at:
[I 2024-06-18 18:03:04.068 ServerApp] http://localhost:8888/tree?token=655159d64caace4f30c9f0ec9d3851de6eb4b7a7497d3a04
[I 2024-06-18 18:03:04.068 ServerApp]     http://127.0.0.1:8888/tree?token=655159d64caace4f30c9f0ec9d3851de6eb4b7a7497d3a04
[I 2024-06-18 18:03:04.068 ServerApp] Use Control-C to stop this server and shut down all kernels (twice to skip confirmation).
[C 2024-06-18 18:03:04.084 ServerApp]

    To access the server, open this file in a browser:
        file:///C:/Users/zhangkai/AppData/Roaming/jupyter/runtime/jpserver-1112-open.html
    Or copy and paste one of these URLs:
        http://localhost:8888/tree?token=655159d64caace4f30c9f0ec9d3851de6eb4b7a7497d3a04
        http://127.0.0.1:8888/tree?token=655159d64caace4f30c9f0ec9d3851de6eb4b7a7497d3a04
[I 2024-06-18 18:03:04.115 ServerApp] Skipped non-installed server(s): bash-language-server, dockerfile-language-server-nodejs, javascript-typescript-langserver, jedi-language-server, julia-language-server, pyright, python-language-server, r-languageserver, sql-language-server, texlab, typescript-language-server, unified-language-server, vscode-css-languageserver-bin, vscode-html-languageserver-bin, vscode-json-languageserver-bin, yaml-language-server
0.00s - Debugger warning: It seems that frozen modules are being used, which may
0.00s - make the debugger miss breakpoints. Please pass -Xfrozen_modules=off
0.00s - to python to disable frozen modules.
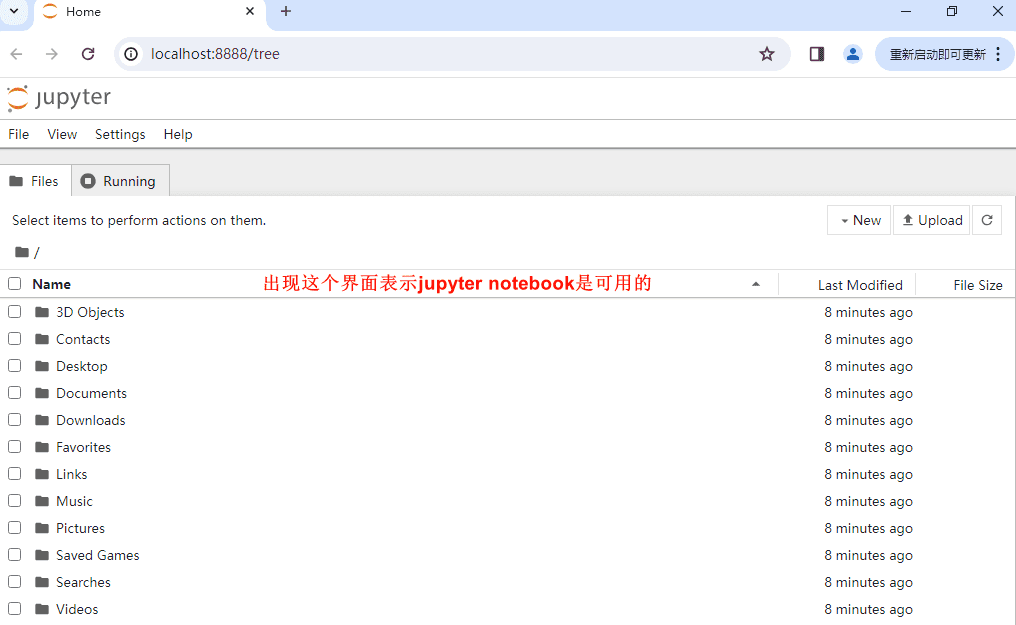
0.00s - Note: Debugging will proceed. Set PYDEVD_DISABLE_FILE_VALIDATION=1 to disable this validation.默认浏览器自动打开jupyter notebook的界面:

换源
清华大学开源镜像站:https://mirrors.tuna.tsinghua.edu.cn/help/anaconda/
根据 清华大学开源镜像站 提供的镜像源的介绍,我们先更换 conda 的源。
在终端中输入:
conda config --set show_channel_urls yes即可创建 conda 配置文件,打开文件资源管理器,在用户主目录下即可可以找到名为 .condarc 的文件。找不到就执行这个命令,也就是之前让留意的那个文件:
C:\Users\zhangkai>conda info

     active environment : None
user config file : C:\Users\zhangkai\.condarc # 就这个文件用记事本打开这个文件。用下面的内容 完全替换 原本的内容。
channels:
  - defaults
show_channel_urls: true
default_channels:
  - https://mirrors.tuna.tsinghua.edu.cn/anaconda/pkgs/main
  - https://mirrors.tuna.tsinghua.edu.cn/anaconda/pkgs/r
  - https://mirrors.tuna.tsinghua.edu.cn/anaconda/pkgs/msys2
custom_channels:
  conda-forge: https://mirrors.tuna.tsinghua.edu.cn/anaconda/cloud
  msys2: https://mirrors.tuna.tsinghua.edu.cn/anaconda/cloud
  bioconda: https://mirrors.tuna.tsinghua.edu.cn/anaconda/cloud
  menpo: https://mirrors.tuna.tsinghua.edu.cn/anaconda/cloud
  pytorch: https://mirrors.tuna.tsinghua.edu.cn/anaconda/cloud
  pytorch-lts: https://mirrors.tuna.tsinghua.edu.cn/anaconda/cloud
  simpleitk: https://mirrors.tuna.tsinghua.edu.cn/anaconda/cloud
deepmodeling: https://mirrors.tuna.tsinghua.edu.cn/anaconda/cloud/替换完成后保存,关闭记事本,即为换源成功。
到此,安装成功了。
anaconda附带的工具软件介绍
1. Anaconda Navigator
Anaconda Navigator 是一款图形用户界面(GUI)工具,提供一个直观、便捷的方式来管理和使用 Anaconda 分发版中的软件包、环境和相关应用程序,而无需频繁使用命令行指令。 在开始菜单即可找到 Anaconda Navigator,双击打开就可以看到一个 GUI 界面。

软件的左侧有 4 个选项卡:分别是 Home,Environments,Learning 和 Community。
Home:列出了所有由 Anaconda Navigator 管理的 应用程序集合。如 Jupyter Notebook、JupyterLab、RStudio、Spyder、VS Code 等集成开发环境(IDE)、数据分析工具和科学计算软件。只需点击对应图标即可快速启动这些应用程序。
Environment:管理当前计算机上所有安装的 conda 环境。可以方便的安装、更新、卸载环境内的软件包,以及查看各个环境的详细包列表。
Learning:主要提供给各种在线文档和教程。
Community:提供指向 Anaconda 平台教程、官方文档、社区论坛、博客和其他学习资源的链接,可以进一步了解和利用 Anaconda 生态系统进行数据分析、机器学习、科学计算等工作。
2. Jupyter Notebook
Jupyter Notebook 是一个开源的交互式计算环境,它以网页应用程序的形式为用户提供了一个灵活且功能丰富的平台,用于创建和分享包含代码、文本、数学公式、可视化图表以及多媒体内容的文学化程序文档。主要有以下特性:
- 交互式计算:用户可以在 Notebook 中编写代码片段,这些代码被组织成可独立运行的单元格。支持多种编程语言,包括但不限于 Python、R、Julia、Scala、SQL、JavaScript 等,通过安装相应的内核(kernel)来处理不同语言的执行。
- 即时反馈:即所见即所得,单个代码单元格可以单独执行,结果立即在单元格下方显示。这允许用户快速迭代代码、检查中间结果,并进行数据分析或模型训练等任务。
- 可视化:集成多种数据可视化库(如 Matplotlib、Seaborn、Plotly 等),允许直接在 Notebook 中生成图表并将其嵌入文档中,便于实时查看和调整数据可视化效果。
- spyder:Spyder 是一款专为 Python 开发者设计的集成开发环境(IDE),尤其侧重于满足科学计算、数据分析、机器学习和科学计算领域的特定需求。
虚拟环境管理
# 查看conda的配置
conda config --show

# 修改配置
conda config --add key value
conda config --remove key value

# 检查更新当前的conda管理工具
conda update -n base -c defaults conda -y

# 查看当前环境已安装的包
conda list
pip list
pip freeze

# 创建虚拟环境,指定虚拟环境的Python版本,不指定的话,默认跟anaconda的默认Python解释器版本
# 注意,使用conda config --show查看envs_dirs指向的路径,该路径是虚拟环境的默认安装位置,你也可以修改这个值
conda create -n 虚拟环境名称 python=3.6 -y

# 修改虚拟环境的保存位置,默认是保存到了用户家目录下
conda config --add envs_dirs C:\ProgramData\Anaconda3\envs

# 激活/退出虚拟环境
conda activate 虚拟环境名称
conda deactivate

# 为指定虚拟环境安装指定包,删除指定包;当然,也可以在激活虚拟环境后,使用pip下载,他俩的区别:conda可以不激活虚拟环境,就可以为指定虚拟环境安装包,而pip需要激活对应的虚拟环境才能安装包
conda install -n 虚拟环境名称 包名 -y
conda remove -n 虚拟环境名称 包名 -y

# 查看所有虚拟环境
conda info --envs
conda info -e
conda env list

# 删除指定虚拟环境
conda remove -n 虚拟环境名称 --all -y�� --all -y