 王张开
王张开所谓"白名单"
都是谁能访问MySQL?应用程序、管理员、MySQL备份、监控这些会访问。
白名单就是控制哪些"人"能访问MySQL服务。
白名单设置越精细越好,最起码能防止一些攻击。
用户管理
注意,不同的MySQL版本,用户管理的命令也略有不同,当然那,也包含其它的命令,都会多多少少的有点区别,这点你在做相关操作时要额外注意,你的MySQL版本。
desc mysql.user;

	    用户  白名单    密文密码            密码加密的方式(插件)
select user,host,authentication_string,plugin from mysql.user;-- 创建一个支持远程连接的用户,但此时该用户只能登录到MySQL,但啥权限都没有
create user zhangkai@'%' identified by "123";
create user zhangkai@'%' identified with mysql_native_password by "123";
-- 修改密码插件时要同时修改其密码,也就是让它以修改后的插件从新加下密
alter user zhangkai@'%' identified with mysql_native_password by "123";drop user zhangkai@'%';alter user root@'localhost' identified with mysql_native_password by "123";用户资源管理
普通账号密码忘记找回
root账号密码忘记找回
关闭数据库


mysqld_safe --skip_grant-tables --skip-networking &
-- 解释下
-- --skip_grant-tables 跳过授权表登录
-- --skip-networking   禁用远程登录,只能本地登录

flush privileges;
alter user root@'localhost' identified with mysql_native_password by "123";
shutdown;grant all on 和grant privileges on的区别
参考:https://juejin.cn/s/mysql grant all vs grant all privileges
windows系统MySQL8.x忘记密码找回
win10 + mysql8.0.31
原来MySQL8之前的密码找回都是在配置文件my.ini中配置skip-grant-tables进行找回,结果到了MySQL8中不好使了。只能从新琢磨了。
前提:此时你的MySQL服务应该是正常运行,只是你忘了登录密码,想要重置密码,执行下面的操作。
注意,接下来的操作,都要在管理员权限打开的终端中执行
1. 首先管理员权限打开一个终端停止MySQL服务 我的系统服务中,MySQL服务名字叫做mysqld。 
那么我在终端中应该执行:
net stop mysqld
2. 执行下面的命令启动MySQL服务,为了能让后续无密码登录
mysqld --console --skip-grant-tables --shared-memory命令执行成功,就卡主了,这是好现象,就让它在这卡着吧,我们有其他事情做。 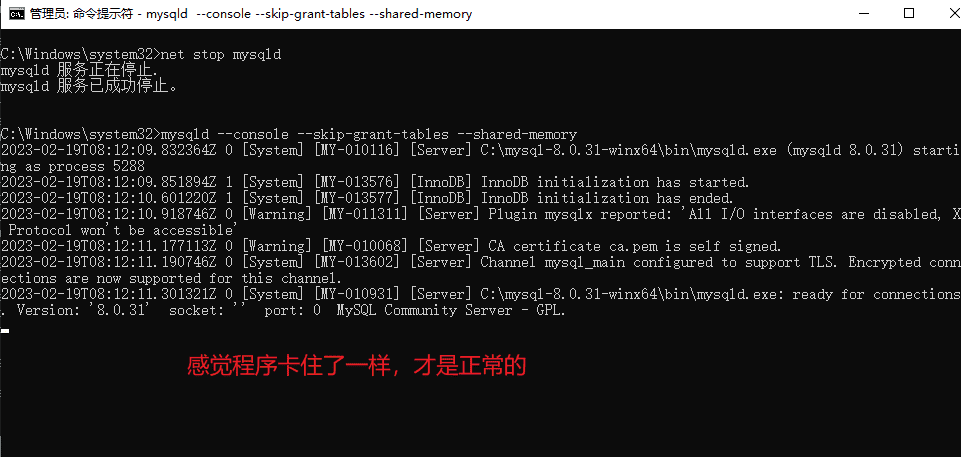
3. 以管理员权限再打开一个新的终端,执行命令
mysql -uroot

use mysql;
update user set authentication_string='' where user='root';
exit;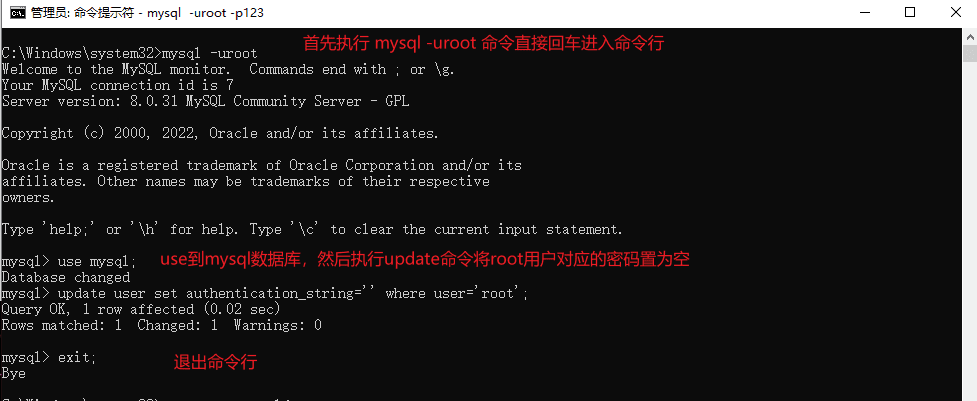
此时,root账户的密码应该是空密码了。 4. 直接按×结束掉之前(步骤2)打开的终端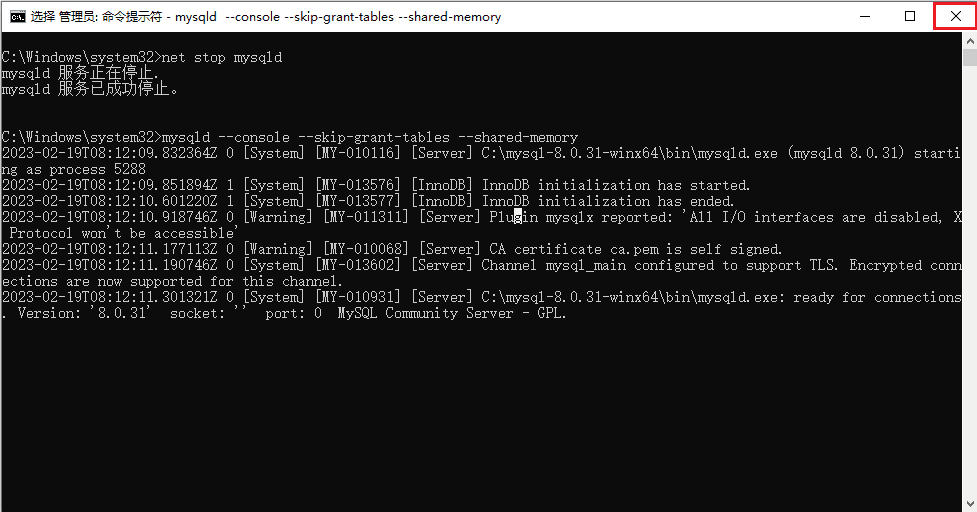 此时,在剩下的终端中继续执行后续命令。
5. 重新启动MySQL服务
net start mysql 6. 重置密码
mysql -uroot

alter user root@'localhost' identified with mysql_native_password by "123";
flush privileges;
exit;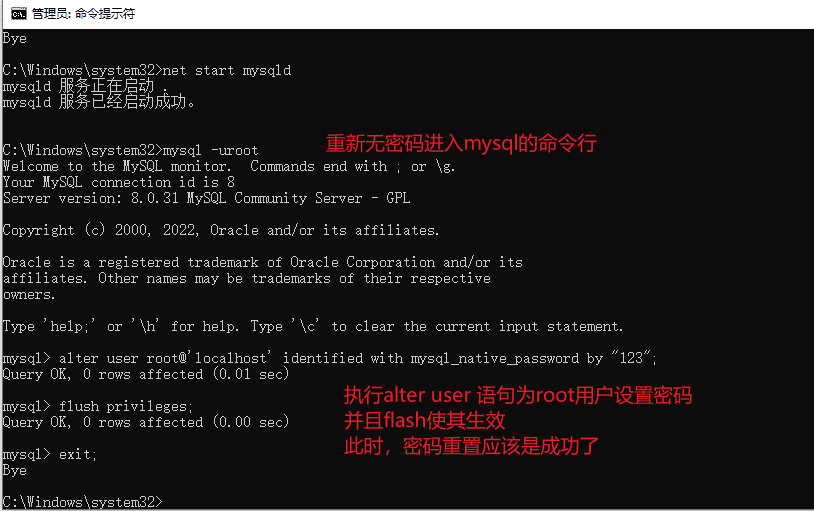
7. 验证是否重置成功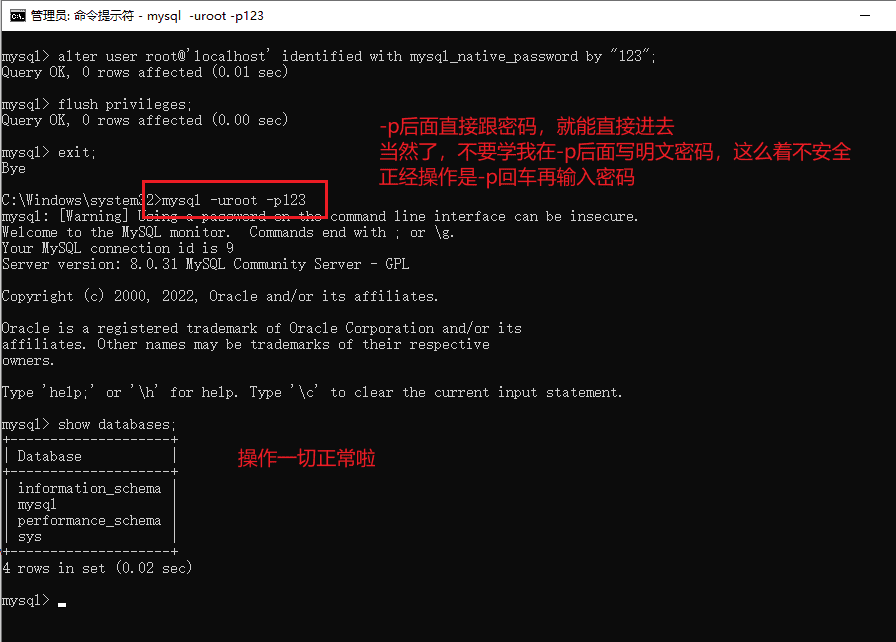 OK,成功啦。
参考:
mysql8 mac系统修改密码
mysql8.0.32 + mac intel芯片
这个就是一切正常,现在的密码也正常,但想换个密码,你可以:
-- 1. 首先你以原密码进行登录
EvendeMacBook-Air:local even$ mysql -uroot -p
Enter password:
Welcome to the MySQL monitor.  Commands end with ; or \g.
Your MySQL connection id is 64
Server version: 8.0.32 MySQL Community Server - GPL

Copyright (c) 2000, 2023, Oracle and/or its affiliates.

Oracle is a registered trademark of Oracle Corporation and/or its
affiliates. Other names may be trademarks of their respective
owners.

Type 'help;' or '\h' for help. Type '\c' to clear the current input statement.


-- 2. 进入mysql表
mysql> use mysql;
Reading table information for completion of table and column names
You can turn off this feature to get a quicker startup with -A

Database changed

-- 3. 执行update命令先清空密码
mysql> update user set authentication_string="" where user="root";
Query OK, 1 row affected (0.00 sec)
Rows matched: 1  Changed: 1  Warnings: 0

-- 4. 然后修改新密码,这一步和上一步都必不可少
mysql> alter user "root"@"localhost" identified by "你的新密码";
Query OK, 0 rows affected (0.00 sec)

-- 5. 必不可少的步骤,刷新授权表,使其生效
mysql> flush privileges;
Query OK, 0 rows affected (0.01 sec)

-- 6. 退出当前交互时环境
mysql> exit;
Bye

-- 7. 重新以新密码的形式进入即可
EvendeMacBook-Air:local even$ mysql -uroot -p
Enter password:
Welcome to the MySQL monitor.  Commands end with ; or \g.
Your MySQL connection id is 64
Server version: 8.0.32 MySQL Community Server - GPL

Copyright (c) 2000, 2023, Oracle and/or its affiliates.

Oracle is a registered trademark of Oracle Corporation and/or its
affiliates. Other names may be trademarks of their respective
owners.

Type 'help;' or '\h' for help. Type '\c' to clear the current input statement.

mysql>OK了。
mysql8 mac系统忘记密码找回
mysql8.0.32 + mac intel芯片 参考:https://blog.csdn.net/Aimee1717/article/details/129447994
这个场景适用于忘记密码,用上面的修改密码也不好使的情况。
1. 关闭当前的mysqld 你可以通过终端输入如下命令执行(前提是添加好了环境变量):
-- 停止当前mysqld服务
sudo mysql.server stop

-- 补充一个启动命令
sudo mysql.server stop上面命令搞不定的话,就打开设置,从这里关闭,截图从网上找来的。 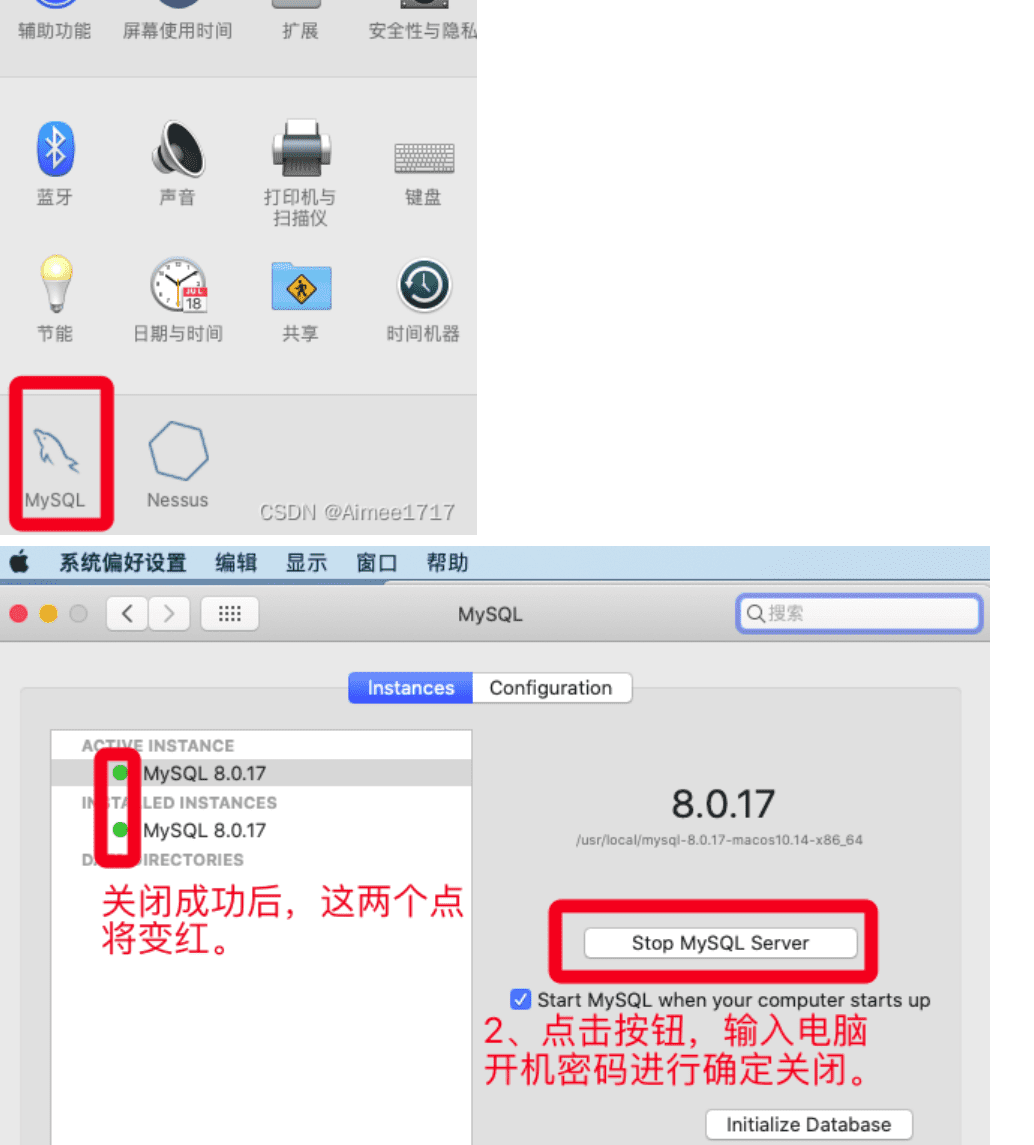
2. 以安全模式启动 如果你的环境变量配置好了的话,直接输入:
sudo mysqld_safe --skip-grant-tables &3. 再打开一个终端 打开的终端中输入:
-- 1. 输入下面的命令,遇到输入密码的步骤,直接回车
mysql -uroot -p

-- 2. 执行如下命令
-- 进入mysql表
use mysql;
-- 清空下当前的密码(我原来本以为可以在这里直接设置新的密码,结果不行,所以这里先清空)
update user set authentication_string='' where user='root';
-- 退出当前终端
exti;3. 设置新的密码
打开的终端输入:mysql -uroot -p 点击回车,输入密码时,直接回车; 然后接着输入:
-- 进入mysql表
use mysql;
-- 更新密码
alter user 'root'@'localhost' identified by "你的新密码";
-- 刷新生效
flush privileges;
-- 退出当前终端
exti;4. 现在就可以进行测试了 你可以执行下面两个命令,重启下mysql服务。
sudo mysql.server stop
sudo mysql.server stop
``
然后终端继续输入`mysql -uroot -p`回车,然后输入设置的新密码。

# 常见问题
## 云服务器上的MySQL只能通过-h 127.0.0.1 进行登录访问
> 阿里云的Ubuntu20.04 + 8.0.33-0ubuntu0.20.04.4

一个学生通过apt-get命令下载了MySQL之后,不知道咋创建了一个账号,但登录的时候,只能这样:
```bash
# 登不上
mysql -uzhangkai -p123456

# 必须这么访问
mysql -h 127.0.0.1 -uzhangkai -p123456原因是这样的,你查看他的mysql.user表:
mysql> select Host,User,authentication_string,plugin from mysql.user;
+-----------+------------------+------------------------------------------------------------------------+-----------------------+
| Host      | User             | authentication_string                                                  | plugin                |
+-----------+------------------+------------------------------------------------------------------------+-----------------------+
| 127.0.0.1 | zhangkai         | $A$005$sf
                                          0mw5jWBtT5REL//kqB2peOhr6YHcZ/reb4Yhl1rFe6VVoeBRwUoM5 | caching_sha2_password |
| localhost | debian-sys-maint | $A$005$CoPn;0\Yc%EN]DQ546U4rmM1bLpCmhGNRXHY0Ah4S207wIscfAAhY.ycD | caching_sha2_password |
| localhost | mysql.infoschema | $A$005$THISISACOMBINATIONOFINVALIDSALTANDPASSWORDTHATMUSTNEVERBRBEUSED | caching_sha2_password |
| localhost | mysql.session    | $A$005$THISISACOMBINATIONOFINVALIDSALTANDPASSWORDTHATMUSTNEVERBRBEUSED | caching_sha2_password |
| localhost | mysql.sys        | $A$005$THISISACOMBINATIONOFINVALIDSALTANDPASSWORDTHATMUSTNEVERBRBEUSED | caching_sha2_password |
| localhost | root             | *6BB4837EB74329105EE4568DDA7DC67ED2CA2AD9                              | mysql_native_password |
+-----------+------------------+------------------------------------------------------------------------+-----------------------+
7 rows in set (0.00 sec)调整:
mysql> -- 1. 它的用户的密码插件是caching_sha2_password,没有啥意义了,我这里选择删除用户再重新创建一个合理的用户
mysql> drop user 'zhangkai'@127.0.0.1;
mysql> -- 重新创建一个用户
mysql> create user zhangkai@'%' identified with mysql_native_password by "123456";

mysql> -- 默认的创建的普通用户没啥权限,我们要给这个用户授权,允许该用户可以本地和远程登录,并且能够操作所有数据库中的所有表,这个权限已经不小了
mysql> grant all on *.* to zhangkai@"%";然后就好了。
ERROR 1819 (HY000): Your password does not satisfy the current policy requirements
阿里云的Ubuntu20.04 + 8.0.33-0ubuntu0.20.04.4
在修改用户的信息时,发现报这个错误:
mysql> alter user root@"localhost" identified with mysql_native_password by "123";
ERROR 1819 (HY000): Your password does not satisfy the current policy requirements意思是密码不符合当前的规范,原因是mysql8中,对密码强度和长度都有规定,我们可以通过下面的命令查看:
mysql> SHOW VARIABLES LIKE 'validate_password%';
+--------------------------------------+--------+
| Variable_name                        | Value  |
+--------------------------------------+--------+
| validate_password.check_user_name    | ON     |
| validate_password.dictionary_file    |        |
| validate_password.length             | 8      |
| validate_password.mixed_case_count   | 1      |
| validate_password.number_count       | 1      |
| validate_password.policy             | MEDIUM |
| validate_password.special_char_count | 1      |
+--------------------------------------+--------+
7 rows in set (0.00 sec)解决办法就是,修改策略:
-- 调整密码强度限制,只要密码符合validate_password.length值就行了。
set global validate_password.policy=LOW;
-- 密码长度限制为6位
set global validate_password.length=6;然后我们在调整用户的密码就可以了:
alter user root@"localhost" identified with mysql_native_password by "123456";参考: